uncategorized
Networking in Kubernetes
Kubernetes
Container Networking Interface
We know all the container solutions that work with containers like rkt, Kubernetes, docker solve the networking challenges in kind of the same way and requires to configure networking between them like Kubernetes.
So, We create a single standard approach that everyone can follow. We take all the ideas from different solutions and move all the networking portions of it into a single program or code. And since this is for the bridge network we call it Bridge.
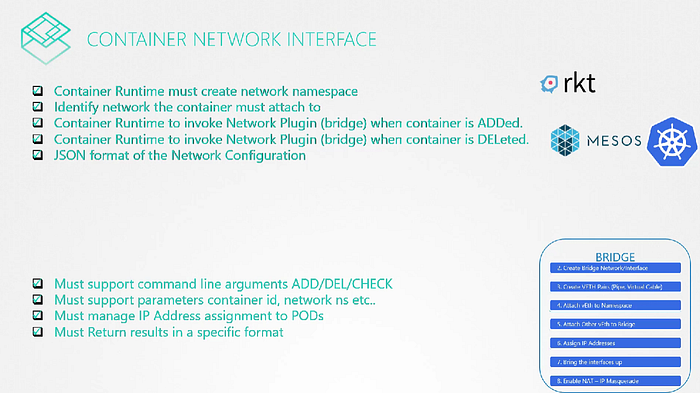
We created a program or script that performs all the required tasks to get the container attached to bridge network. If we run this program and wanted to add any container to a particular network namespace. The bridge program takes care of the rest so that the container runtime environment are relieved of those tasks. Rkt and Kubernetes did the same when they create a new container. they pass the container id and namespace to get networking configured for that container.
 *What if we want to create same program? What arguments and command it should support? and also How will it make sure that the program will work correctly with these run times? and How these containers run times will invoke it? ** *That’s where we need some standard defined.
CNI —: set of standards that define how programs should be developed to solve networking challenges in a Container Runtime Environment. The programs are referred to as plugins. In this case bridge program referring to is a plugin for CNI.
CNI defines how a plugin should be developed and how container run times should invoke them. It defines set of responsibilities for Container run times and plugin.
*What if we want to create same program? What arguments and command it should support? and also How will it make sure that the program will work correctly with these run times? and How these containers run times will invoke it? ** *That’s where we need some standard defined.
CNI —: set of standards that define how programs should be developed to solve networking challenges in a Container Runtime Environment. The programs are referred to as plugins. In this case bridge program referring to is a plugin for CNI.
CNI defines how a plugin should be developed and how container run times should invoke them. It defines set of responsibilities for Container run times and plugin.
 CNI comes with set of supported plugins already. Such as bridge, VLAN, IPvLAN, MacVLAN, one for windows as well as IPAM plugins like host-local and dhcp.
Third party plugins also available like Vmware NSX, Calico, Infoblox, flannel, weave, ciium etc.
CNI comes with set of supported plugins already. Such as bridge, VLAN, IPvLAN, MacVLAN, one for windows as well as IPAM plugins like host-local and dhcp.
Third party plugins also available like Vmware NSX, Calico, Infoblox, flannel, weave, ciium etc.

Why Docker isn’t in this list?
Docker doesn’t implement CNI. It has its own set of standards known as CNM (Container Network Model) which is another standard that aims at solving container networking challenges similar to CNI but with some differences.
Due to the differences these plugins don’t natively integrate with Docker.
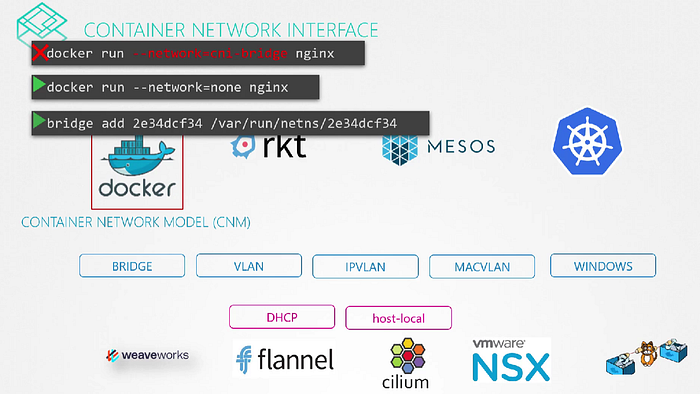 This doesn’t mean we can’t use Docker with CNI at all. We just have to work around it by ourselves. For example, we can create a docker container without any network configuration and then manually invoke the bridge plugin yourself. That is pretty much how Kubernetes does it.
Cluster Networking
The Kubernetes Cluster consists of Master and worker nodes. Each node must have at least 1 interface connected to a network. Each interface must have an address configured. The hosts must have a unique hostname set as well as unique MAC address.
If you created the VMs by cloning from existing ones. There are some ports that needs to be opened as well. These are used by various components in the control plane. The master should accept connections on 6443 for the API server. The worker nodes, kubectl tool, external users and all other control plane components access the kube-api server via this port.
Kubelets on the master and worker nodes listen on 10250. Kubelet’s can be present on the master node as well. The kube-scheduler requries port 10251 to be open. The kube-controller-manager requires port 10252 to be open. The worker nodes expose services for external access on ports 30000 to 32767. So these should be open as well.
Finally the ETCD server listens on port 2379. If you have multiple master nodes all of these ports need to be open on those as well. And also you need an additional 2380 port open so the ETCD clients can communicate with each other.

 For more than one master nodes
Pod Networking
Our Kubernetes cluster is soon going to have a large number of pods and services running on it. How are pods addressed? How they communicate with each other? How do we access the applications running on these pods internally within the cluster.
 Kubernetes does not come with the built-in solutions. It expects us to implement a networking solution that solve these challenges.
What Kubernetes expects?
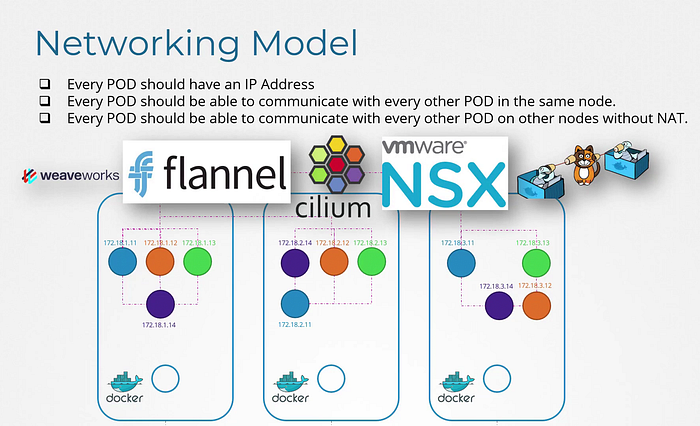
- Every POD should have an IP address
- Every POD should be able to communicate with every other POD in the same node
- Every POD should be able to communicate with every other POD on the other nodes without NAT.
 We can use many networking solutions other there for that.
Let’s understand it by an example how these solutions work. They have the same concept we see earlier in our previous blogs.
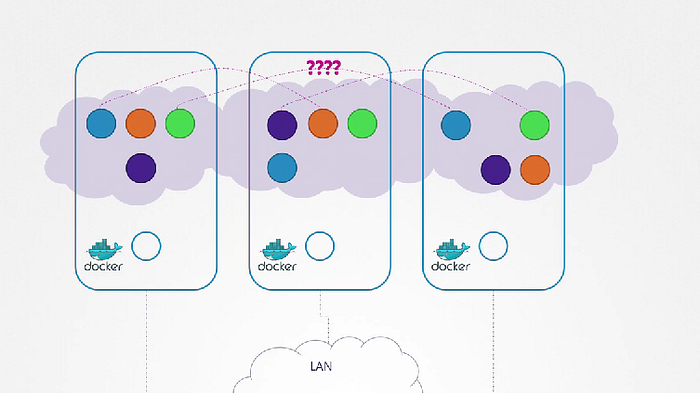
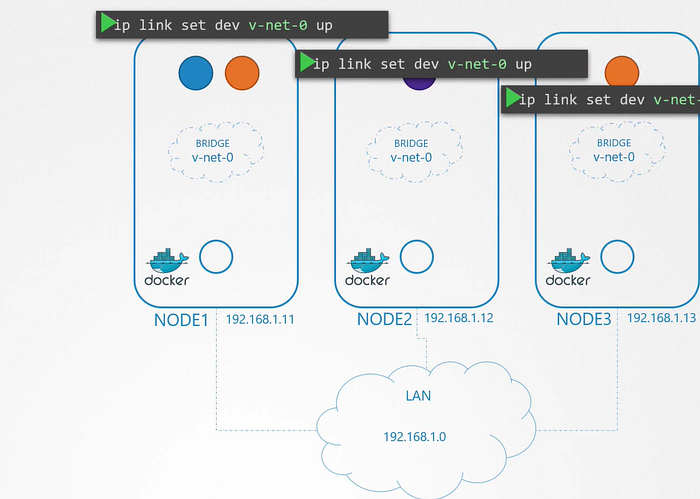
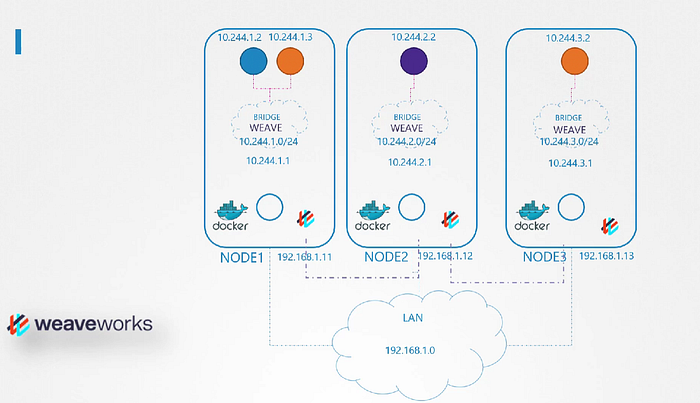
We have three node cluster, doesn’t matter which one is master or worker. they all run pods either for management or work load purposes. now we have to configure networking for them as the same.
First, here nodes are part of the external network and has IP addresses in the 192.160.1. series. Node 1 has 11, Node 2 has 12 and Node 3 has 13
When containers are created Kubernetes creates a network namespace for them. Now we have to enable communication between them.
To enable communication between we attach the namespaces to the network but what network? We know Bridge networks that can be created within the nodes to attach namespaces.
We create a bridge network on each node and then bring them up. Now next step will be assigning the IP address to the bridge interfaces or the networks.
We can use many networking solutions other there for that.
Let’s understand it by an example how these solutions work. They have the same concept we see earlier in our previous blogs.
We have three node cluster, doesn’t matter which one is master or worker. they all run pods either for management or work load purposes. now we have to configure networking for them as the same.
First, here nodes are part of the external network and has IP addresses in the 192.160.1. series. Node 1 has 11, Node 2 has 12 and Node 3 has 13
When containers are created Kubernetes creates a network namespace for them. Now we have to enable communication between them.
To enable communication between we attach the namespaces to the network but what network? We know Bridge networks that can be created within the nodes to attach namespaces.
We create a bridge network on each node and then bring them up. Now next step will be assigning the IP address to the bridge interfaces or the networks.
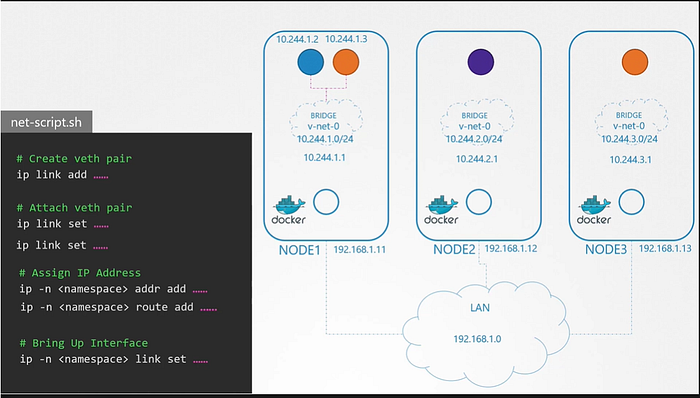
 But what IP address? We decide that each bridge network will be on its own sub-net, choose any private address range such as 10.244.1., 10.244.2. and 10.244.3.
 Now, In next step we set the IP address for the bridge interface. now remaining steps are performed for each container. and every time a new container is created. We write a script for it.
It’s just a file with all commands we will be using. We can run this multiple times for each container going forward.
To attach a container to the network, we need a virtual network cable. Which we do with ‘ip link add’ command. Then we will attach one end to the container and another end to the bridge using the ‘ip link set’. then assign IP address using ‘ip addr’ command and add a route to the default gateway.
Now finally we can bring up the interface. We can run the same steps for other containers. And run the script on other nodes as well to assign IP address and connect those containers to their own internal networks.
Now, In next step we set the IP address for the bridge interface. now remaining steps are performed for each container. and every time a new container is created. We write a script for it.
It’s just a file with all commands we will be using. We can run this multiple times for each container going forward.
To attach a container to the network, we need a virtual network cable. Which we do with ‘ip link add’ command. Then we will attach one end to the container and another end to the bridge using the ‘ip link set’. then assign IP address using ‘ip addr’ command and add a route to the default gateway.
Now finally we can bring up the interface. We can run the same steps for other containers. And run the script on other nodes as well to assign IP address and connect those containers to their own internal networks.
 Now first part of the challenge solved. The pods get their own unique IP address and able to communicate with each other on their own nodes.
Next part is to enable them to reach other pods on other nodes.
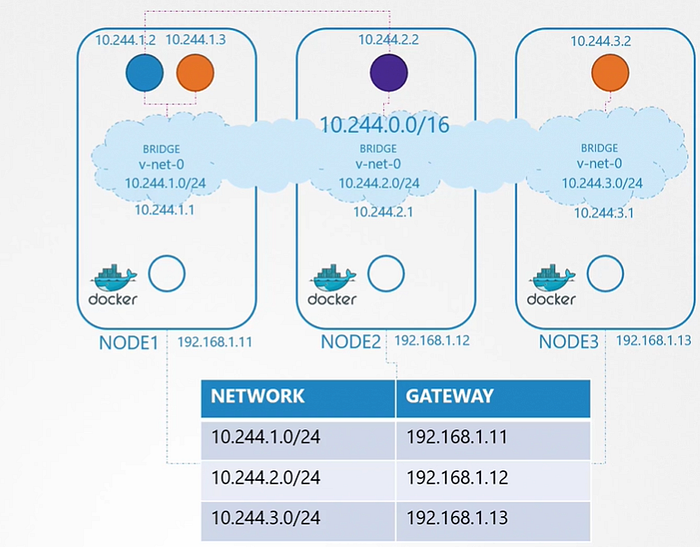
Since pod on other node is on the private network. Pod of Node 1 didn’t know about pod of Node 2. For that we have to configure route on all hosts to all other hosts with information regarding the respective networks within them.
Now first part of the challenge solved. The pods get their own unique IP address and able to communicate with each other on their own nodes.
Next part is to enable them to reach other pods on other nodes.
Since pod on other node is on the private network. Pod of Node 1 didn’t know about pod of Node 2. For that we have to configure route on all hosts to all other hosts with information regarding the respective networks within them.
 This works fine in the simple network setup. But gets lot more configuration as in when your underlying architecture gets complicated. So what’s the solution for that?
Instead of having to configure route on each server, It’s better to do that on a router if you have one in your network and point all hosts to use that as the default gateway. That way you can easily manage the routes to all networks in the routing table on the router.
With that, Individual virtual networks we created with the address 10.244.1.0/24 on each node now form a single large network with the address 10.244.0.0/16.
This works fine in the simple network setup. But gets lot more configuration as in when your underlying architecture gets complicated. So what’s the solution for that?
Instead of having to configure route on each server, It’s better to do that on a router if you have one in your network and point all hosts to use that as the default gateway. That way you can easily manage the routes to all networks in the routing table on the router.
With that, Individual virtual networks we created with the address 10.244.1.0/24 on each node now form a single large network with the address 10.244.0.0/16.
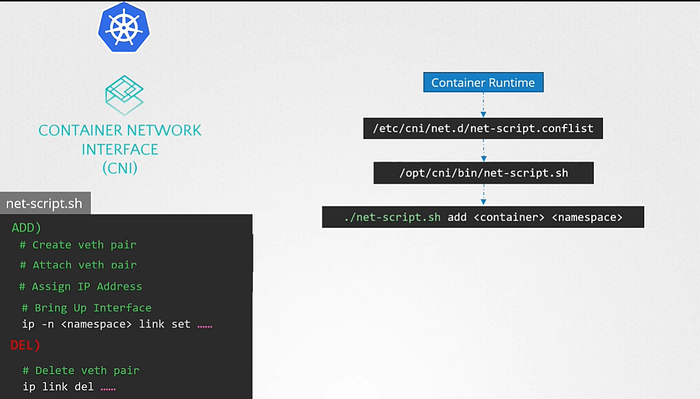
 So How do we run the script automatically when the pod is created on Kubernetes?
That’s where CNI comes in. CNI tells Kubernetes that this is how you should call a script as soon as you create a container. and tells this is how your script looks like.
We have separate sections for that in the script to match with the CNI standards.
So How do we run the script automatically when the pod is created on Kubernetes?
That’s where CNI comes in. CNI tells Kubernetes that this is how you should call a script as soon as you create a container. and tells this is how your script looks like.
We have separate sections for that in the script to match with the CNI standards.
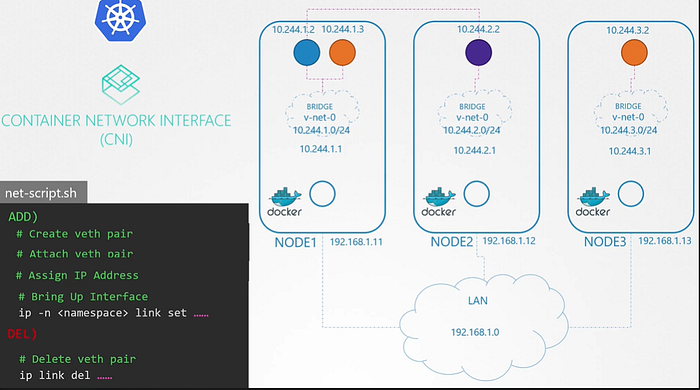 Kubelet on each node is responsible for creating containers, whenever a container is created. Kubelet looks at the CNI configuration passed as a command line argument when it was run and identifies our script’s name. It then looks in the CNI’s bin directory to find our script and then executes the script with the Add command and the name and namespace of the container, and then our script takes care of the rest.
Container Network Interface in Kubernetes
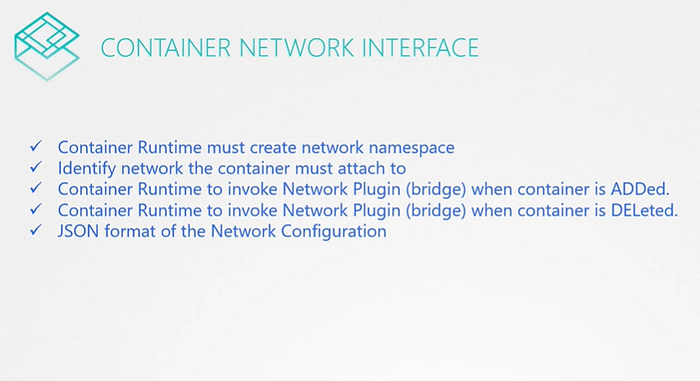 CNI plugin must be invoked by the components of Kubernetes that is responsible for creating containers. Because that component must then invoke the appropriate network plugin after the container is created.
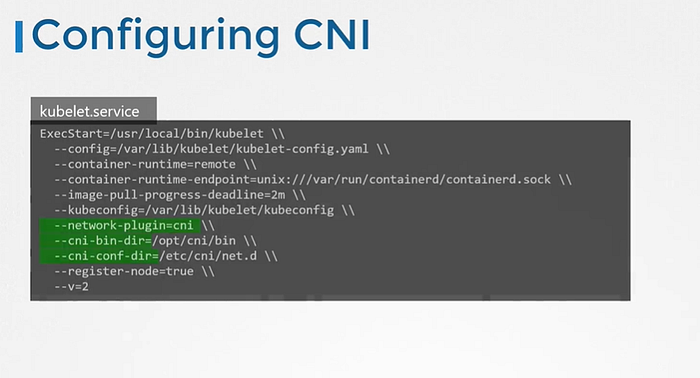
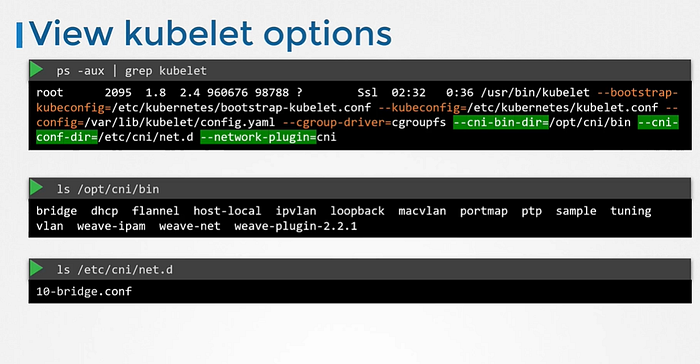
CNI plugin is configured in the kubelet service on each node in the cluster. In the kubelet service file there is an option called network-plugin=cni.
CNI plugin must be invoked by the components of Kubernetes that is responsible for creating containers. Because that component must then invoke the appropriate network plugin after the container is created.
CNI plugin is configured in the kubelet service on each node in the cluster. In the kubelet service file there is an option called network-plugin=cni.
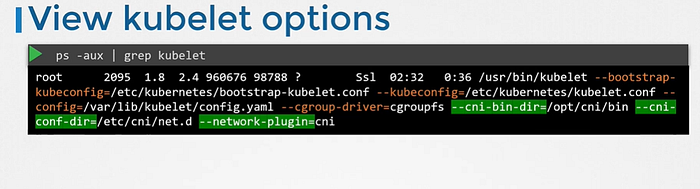
 We can see above information here as well.
 CNI bin directory has all the supported CNI plugins as executables. Such as bridge, dhcp, flannel etc.
The CNI conflict directory has a set of configuration files. where kubelet looks to find out which plugin needs to be used.
CNI bin directory has all the supported CNI plugins as executables. Such as bridge, dhcp, flannel etc.
The CNI conflict directory has a set of configuration files. where kubelet looks to find out which plugin needs to be used.
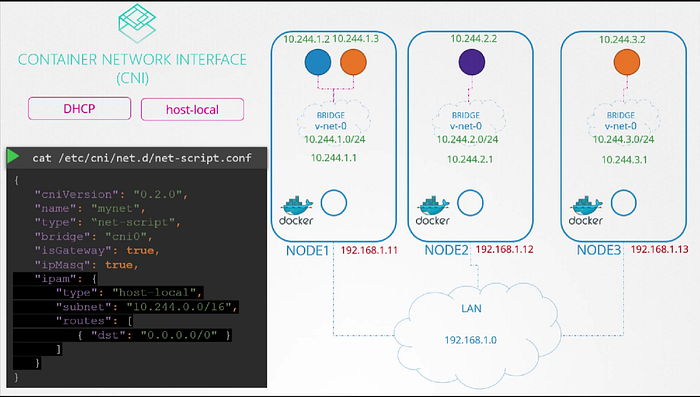
 We can see the plugin configuration file. It is in the format defined by CNI which looks like this.
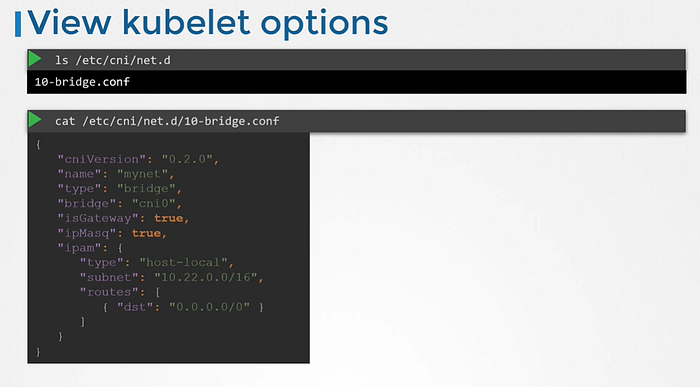 The ipMasquerade defines if a NAT rule should be added for IP masquerading.
The type host-local indicates that the IP addresses are managed locally on the host. Unlike a DHCP server maintaining it remotely. It can be set to DHCP to configure external DHCP server.
The ipMasquerade defines if a NAT rule should be added for IP masquerading.
The type host-local indicates that the IP addresses are managed locally on the host. Unlike a DHCP server maintaining it remotely. It can be set to DHCP to configure external DHCP server.
CNI weave
Instead of our custom script, we can integrate the weave plugin. So the networking solution we set up manually had a routing table which mapped what networks are on what hosts. So when a packet is sent from one pod to the other. It goes out to the network, to the router and finds its way to the node that hosts that pod. Now that works for small and simple network.
But for 100s of nodes in the cluster. It is not practical. The routing table may not support these much entries and that is where we need other solutions.
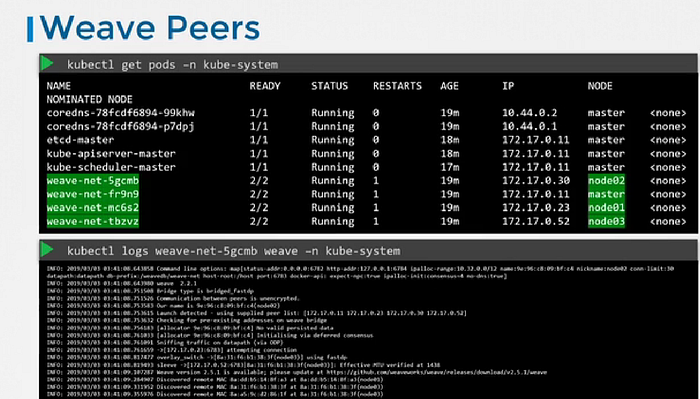
Weave CNI plugin deploys an agent or service on each node. They communicate with each other to exchange the information regarding the nodes and networks and PODs within them. Each agent or peer stores a topology of the entire setup. that way they know the pods and their IPs on the other nodes.
Weave creates its own bridge on the nodes and names it weave. Then assigns IP addresses to each network.
 Remember that a single POD may be attached to multiple bridge networks. What path a packet takes to reach destination depends on the route configured on the container. Weave make sure that PODs get the correct route configured to reach the agent. And agent then takes care of the other PODs. Now when a packet is sent from one pod to another on another node. Weave intercepts the packet and identifies that it’s on separate network. then encapsulates this packet into a new one with new source and destination and sends it across the networks. Once on the other side the other weave agent retrieves the packet decapsulates and routes the packet to the right POD.
Deploy Weave
Weave and weave peers can be deployed as services or daemons on each node in the cluster manually. and if cluster is already setup then an easier way to do that is to deploy it as pods in the cluster.
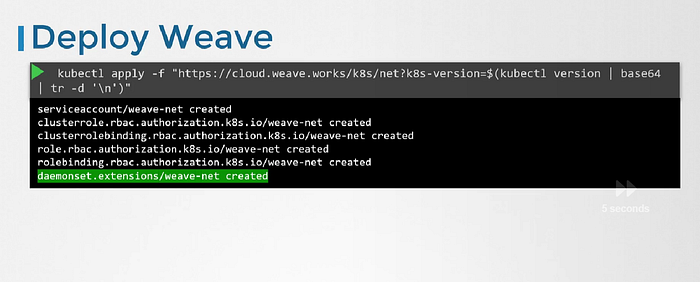
Once the base kubernetes system is ready with nodes and networking configured correctly between the nodes and the basic control plan components are delpoyed, weave can be deployed in the cluster with a single kubectl apply command.
This deploy all necessary components required for weave in the cluster. And Weave peers are deployed as a daemonset. It ensures that one pod of the given kind is deployed on all nodes in the cluster.
IPAM (IP Address Management)
IPAM covers how are the virtual bridge network and nodes assigned an IP subnet and how are the pods assigned an IP. and where this information stored and who is responsible for ensuring there are no duplicate IP is assigned.
CNI says it is the responsibility of CNI plugin the network solution provider to take care of assigning IP to the containers.
 How do we manage these IPs?
Kubernetes doesn’t care how we do it. It just we need to do it by making sure we don’t assign duplicate IPs and manage it properly.
Easy way to do it is to store the list of IPs in a file and make sure we have necessary code in our script to manage this file properly. This file would be placed on each host and manages the IPs of pods on those nodes
How do we manage these IPs?
Kubernetes doesn’t care how we do it. It just we need to do it by making sure we don’t assign duplicate IPs and manage it properly.
Easy way to do it is to store the list of IPs in a file and make sure we have necessary code in our script to manage this file properly. This file would be placed on each host and manages the IPs of pods on those nodes
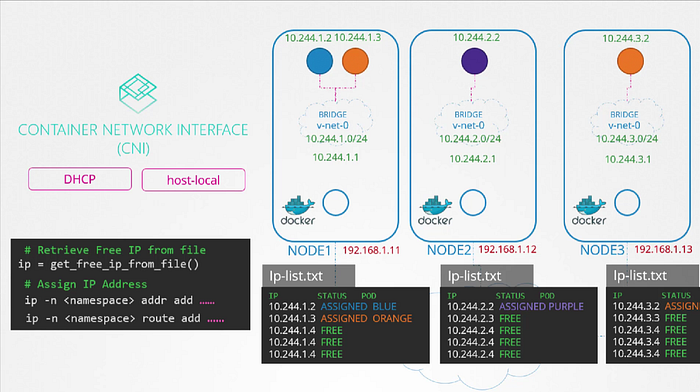 Instead of coding manually, CNI comes with two built in plugins to which you can outsource this task to.
In this case the plugin that implements the approach that we followed for managing IP addresses locally on each host is the ** host-local plugin** but is still our responsibility to invoke that plugin in our script or we can make our script dynamic to support different kinds of plugins.
CNI configuration file has a section called APM in which we can specify the type of plugin to be used the subnet and route to be used. These details can be read from our script to invoke the appropriate plugin instead of hard coding it to use hosted local every time different network solution providers do it differently.
Instead of coding manually, CNI comes with two built in plugins to which you can outsource this task to.
In this case the plugin that implements the approach that we followed for managing IP addresses locally on each host is the ** host-local plugin** but is still our responsibility to invoke that plugin in our script or we can make our script dynamic to support different kinds of plugins.
CNI configuration file has a section called APM in which we can specify the type of plugin to be used the subnet and route to be used. These details can be read from our script to invoke the appropriate plugin instead of hard coding it to use hosted local every time different network solution providers do it differently.
Service Networking
Now in current scenario, we would rarely configure pods to communicate directly with each other. Rather than that we use a service for that. Those service gets an IP address and a name assigned.
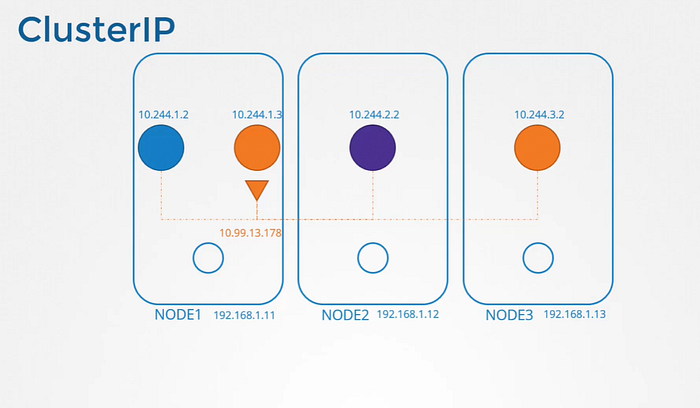
ClusterIP
When a service is created, It is accessible from all parts of the cluster, irrespective of what nodes the pods are on. While a pod is hosted on a node, a service is hosted across the cluster. It is not bound to a specific node. But service is only accessible within the cluster. This type of service is known as ClusterIP.
 Where ClusterIP works fine?
If the orange POD was hosting a database application that is to be only accessed from within the cluster. Then ClusterIP works perfectly for that.
Where ClusterIP works fine?
If the orange POD was hosting a database application that is to be only accessed from within the cluster. Then ClusterIP works perfectly for that.
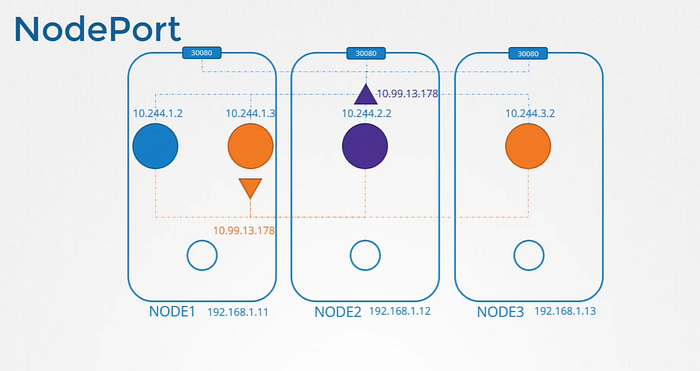
NodePort
This service also gets an IP address assigned to it and works just like ClusterIP. As in all the other PODs can access this service using it’s IP. But in addition to that It also exposes the application on a port on all nodes in the cluster. That way external users or applications have access to the service.
Where NodePort works?
If purple pod was hosting a web application. To make application on the pod accessible outside the cluster. NodePort is the service we create.
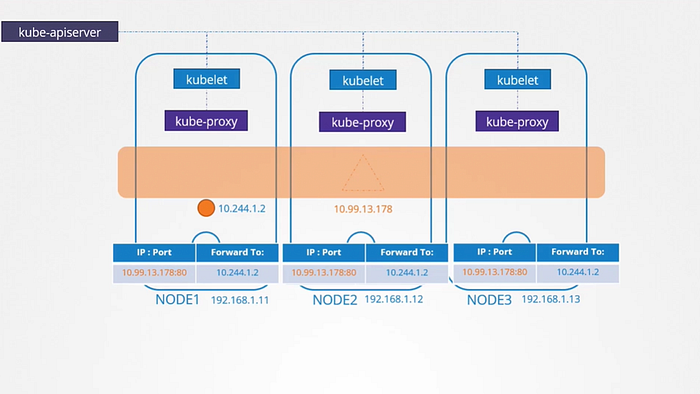
How are these services getting IP addresses and how are they made available across all the nodes in the cluster?
We know that every kubernetes node runs a kubelet process, which is responsible for creating PODs. Each kubelet service on each node watches the changes in the cluster through the kube-api server, and every time a new POD is to be created, it creates the POD on the nodes. It then invokes the CNI plugin to configure networking for that POD. Similarly, each node runs another component known as kube-proxy. Kube proxy watches the changes in the cluster through kube-api server. and every time a new service is to be created. kube-proxy gets into action. Unlike pods, services are not created or assigned to each node. It is cluster wide concept. they exist across all the nodes in the cluster.
As a matter of the fact, they don’t exist at all. there is no service or server really listening on the IP of the service. We have seen that PODs have containers and containers have namespaces with interfaces and IPs assigned to those interfaces. With services nothing like that exists.
There are no processes or namespaces or interfaces for a service. It’s just a virtual object.
So how we were able to access the application on the pod through service?
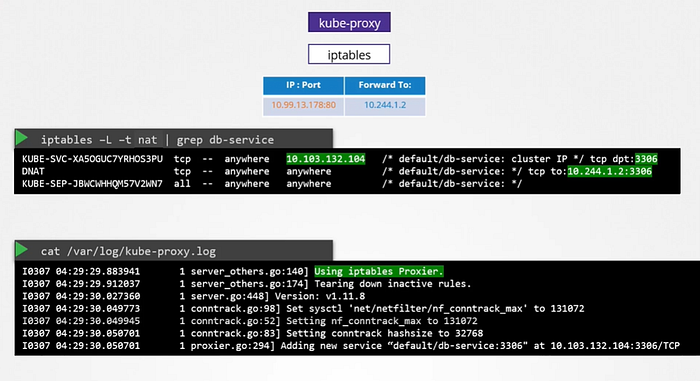
When we create a service object in kubernetes. It is assigned an IP address from a pre-defined range. The kube-proxy components running on each node gets that IP address and create forwarding rules on each node in the cluster. which means any traffic coming to this IP, the IP of the service should go to IP of the POD. Once that is in place, whenever a POD tries to reach the IP of the service, It is forwarded to the POD’s IP address which is accessible from any node in the cluster.
Remember It’s just not IP. It’s combination of IP and the Port.
 So whenever services are created or deleted. The kube-proxy component creates or delete these rules.
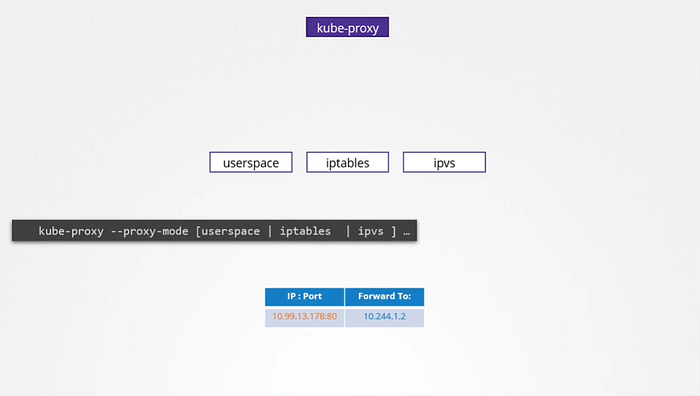
How are these rules created?
kube-proxy supports different ways , such as userspace where kube-proxy listens on a port for each service and proxies connections to the pods. By creating ipvs rules or the third and default option which is using IP tables. The proxy mode can be set using the proxy mode option while configuring the kube-proxy service if this is not set, it defaults to the iptabels.
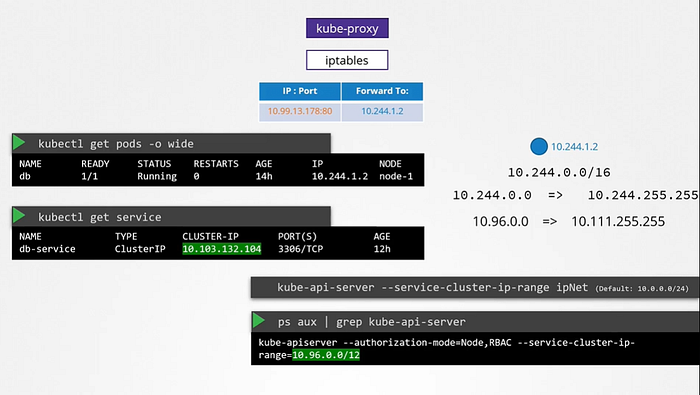
 Note-: Whatever range is specified for each of these networks. It should not overlap. There should not be any case in which pod and a service are assigned the same IP address.

DNS in Kubernetes
Kubernetes deploys a built-in DNS server by default when you setup a cluster. If we setup Kubernetes manually, then we have to do it by ourselves.
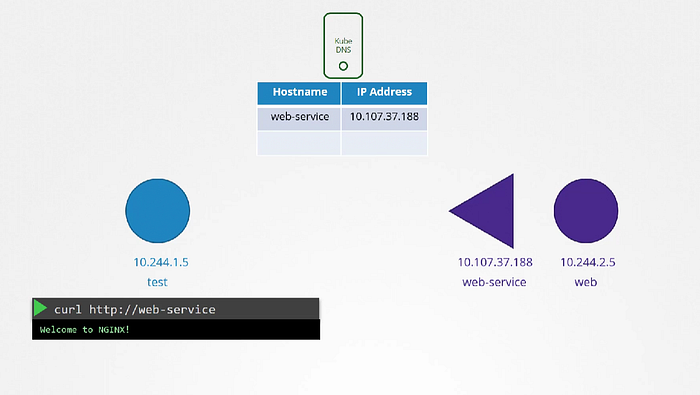
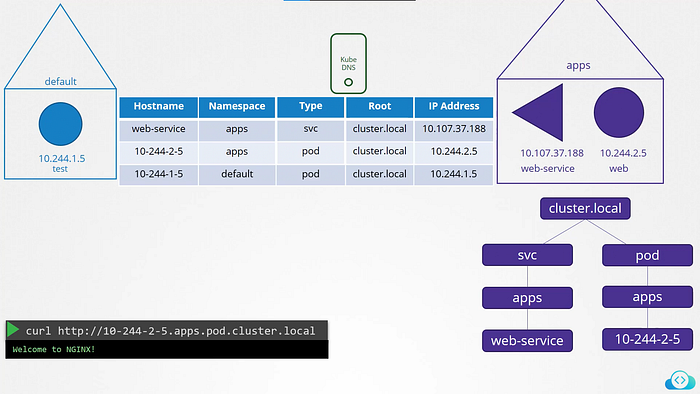
Let’s understand it with an example. At first there are just two PODs and a service. Which we can say a test pod with the IP 10.244.1.5 and a web pod with an IP of 10.244.2.5. We know by looking at the IPs that they are hosted on two different nodes. But that doesn’t matter as far as DNS is concerned.
We assume all the PODs and services can reach each other using their IP addresses. To reach webserver accessible to the test pod. We create a service called as web service. Service gets an IP of 10.107.37.188. Whenever a service is created Kubernetes DNS service creates a record for the service. It maps the service name to the IP address. So, within the cluster any pod can now reach the service using the service name.
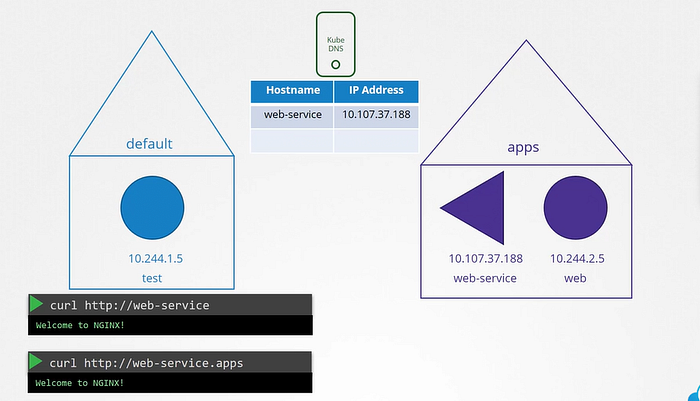
 Here we can use namespace concept to address other pods. If test pod and web-service pod are in the same namespace we can directly access it by it’s own service name. But In case if they are in separate namespace let’s called as apps. To refer the web-service we will say http://web-service.apps.
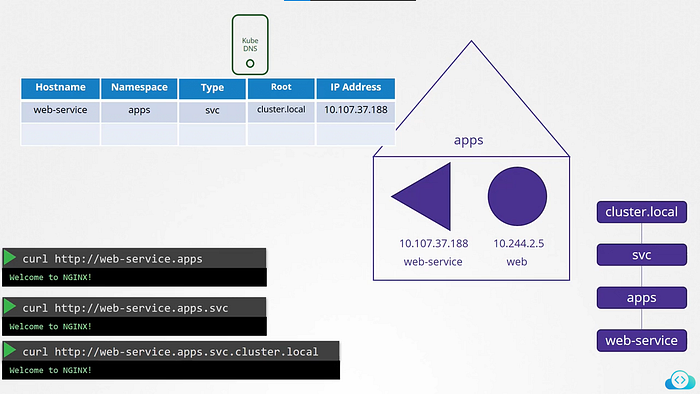
 For Each namespace DNS server creates a subdomain. All the services are grouped together into another subdomain called svc. And finally, all the services and pods are grouped together into the root domain for the cluster which is set to cluster.local by default.
So fully qualified domain (fqdn) for the service is web-service.apps.svc.cluster.local.
For Each namespace DNS server creates a subdomain. All the services are grouped together into another subdomain called svc. And finally, all the services and pods are grouped together into the root domain for the cluster which is set to cluster.local by default.
So fully qualified domain (fqdn) for the service is web-service.apps.svc.cluster.local.
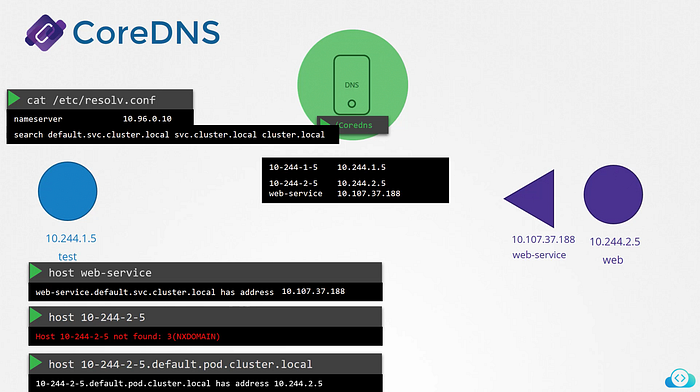
 That’s how services are resolved within the cluster. But for pods Records are not enabled by default. But we can enable that explicitly. Once enabled Records are created for pods as well. It does not use the pod name though. For each pod Kubernetes generates a name by replacing the dots in the IP address to dashes.
CoreDNS
How Kubernetes implements DNS?
As we previously resolve communication between two pods by adding entry to each of their /etc/hosts file. But of course we cannot do that for 1000s of pods.
So we move these entries into a central DNS server. Then we point these PODs to the DNS server by adding an entry into their /etc/resolv.conf file specifying that the nameserver is at the IP address of the DNS server.
In this case, Every time a new pod is created we add a record in the DNS server for that pod so that other pods can access the new POD, and configure the /etc/resolv.conf file in the POD to the DNS server so that the pod can resolve other pods in the cluster. This is how kubernetes does it.
Except that it does not create similar entries for PODs to map podname to its IP address. It does that for services. For pods it forms host names by replacing dotes with dashes in the IP address of the pod. Kubernetes implements DNS in the same way.
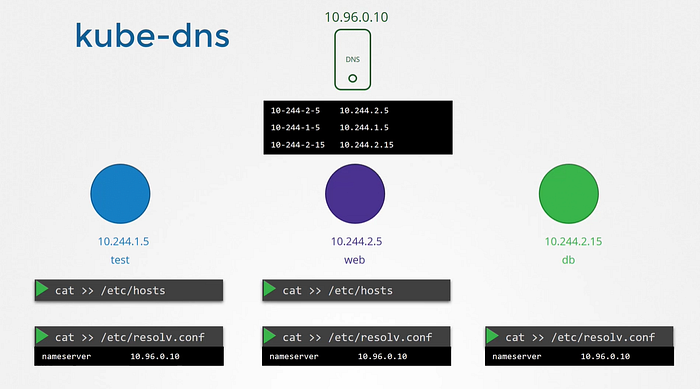 Prior to version v1.12 the DNS implemented by the kubernetes was known as kube-dns.
With v1.12 the recommended DNS server is CoreDNS.
How the CoreDNS setup in the cluster?
The CoreDNS server is deployed as a POD in the kube-system namespace in the kubernetes cluster. They are deployed as two pods for redundancy, as part of replicaset. They are actually a replicaset within a deployment.
This POD runs as CoreDNS as executable, the same executable we ran when we deployed CoreDNS overselves. CoreDNS requires a configuration file. In our case we named it as Corefile. In case of Kubernetes, It uses file named Corefile located at /etc/coredns.
Within this file number of plugins are configured. Plugins are configured for handling errors, reporting heath, monitoring metrics, cache etc. The plugin that makes CoreDNS work with Kubernetes is the kubernetes plugin. And this is where the top-level domain name for the cluster is set. In this case it is cluster.local.
Prior to version v1.12 the DNS implemented by the kubernetes was known as kube-dns.
With v1.12 the recommended DNS server is CoreDNS.
How the CoreDNS setup in the cluster?
The CoreDNS server is deployed as a POD in the kube-system namespace in the kubernetes cluster. They are deployed as two pods for redundancy, as part of replicaset. They are actually a replicaset within a deployment.
This POD runs as CoreDNS as executable, the same executable we ran when we deployed CoreDNS overselves. CoreDNS requires a configuration file. In our case we named it as Corefile. In case of Kubernetes, It uses file named Corefile located at /etc/coredns.
Within this file number of plugins are configured. Plugins are configured for handling errors, reporting heath, monitoring metrics, cache etc. The plugin that makes CoreDNS work with Kubernetes is the kubernetes plugin. And this is where the top-level domain name for the cluster is set. In this case it is cluster.local.
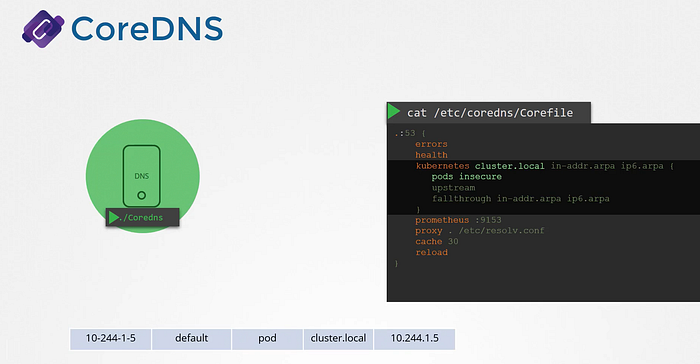 So every record in the coredns DNS server falls under this domain. Within the Kubernetes plugin there are multiple options. The pods option here is what responsible for creating a record for PODs in the cluster. As we earlier see record being created for each POD by converting their IPs into a dashed format that’s disable by default. But it can be enabled with this entry here. Any record that this DNS server can’t solve. It is forwarded to the nameserver specified in the coredns pods /etc/resolv.conf file. This file is set to use the nameserver from the kubernetes node.
Note, This core file is passed into the pod has a configMap object. That way if you need to modify this configuration you can edit the ConfigMap object.
So every record in the coredns DNS server falls under this domain. Within the Kubernetes plugin there are multiple options. The pods option here is what responsible for creating a record for PODs in the cluster. As we earlier see record being created for each POD by converting their IPs into a dashed format that’s disable by default. But it can be enabled with this entry here. Any record that this DNS server can’t solve. It is forwarded to the nameserver specified in the coredns pods /etc/resolv.conf file. This file is set to use the nameserver from the kubernetes node.
Note, This core file is passed into the pod has a configMap object. That way if you need to modify this configuration you can edit the ConfigMap object.
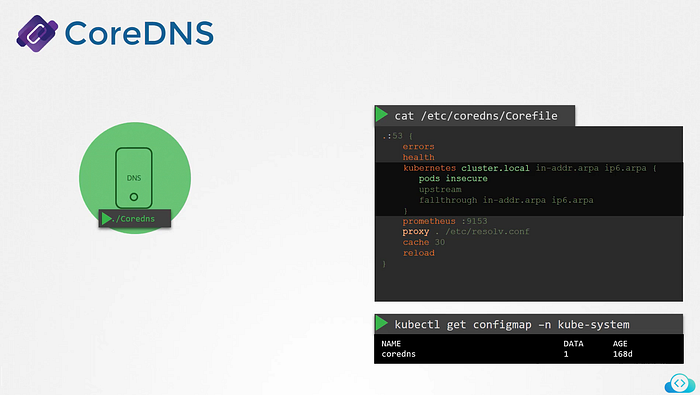 We now have the coredns pod up and running using the appropriate kubernetes plugin. It watches the cluster for new PODs or services and every time a POD or a service is created. It adds a record for it in its database.
Now What’s Next?
Next step is for the pod to point to the CoreDNS server.
When we deploy CoreDNS solution. It also creates a service to make it available to other components within a cluster. The service is named as kube-dns by default. The IP address of the service is configured as nameservcer on the PODs. The DNS configurations on PODs are done by kubernetes automatically when the PODs are created. For that kubelet is the one which is responsible for.
We now have the coredns pod up and running using the appropriate kubernetes plugin. It watches the cluster for new PODs or services and every time a POD or a service is created. It adds a record for it in its database.
Now What’s Next?
Next step is for the pod to point to the CoreDNS server.
When we deploy CoreDNS solution. It also creates a service to make it available to other components within a cluster. The service is named as kube-dns by default. The IP address of the service is configured as nameservcer on the PODs. The DNS configurations on PODs are done by kubernetes automatically when the PODs are created. For that kubelet is the one which is responsible for.
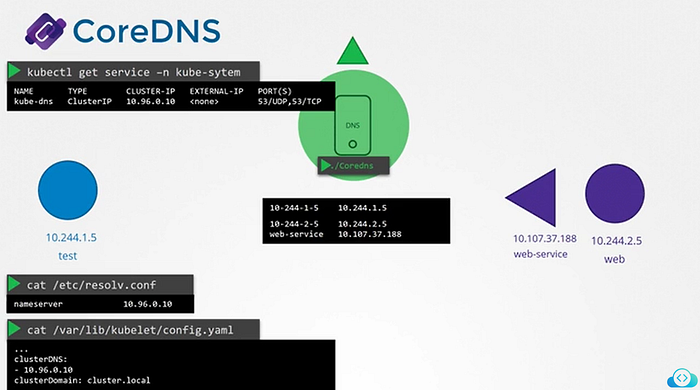 The resolve.conf file also has a search entry which is set to default.svc.cluster.local as well as svc.cluster.local and cluster.local which allows us to find the service using any name.
But as we know that it has search entries only for service not for pod. for PODs we need to specify the full FQDN of the pod.
The resolve.conf file also has a search entry which is set to default.svc.cluster.local as well as svc.cluster.local and cluster.local which allows us to find the service using any name.
But as we know that it has search entries only for service not for pod. for PODs we need to specify the full FQDN of the pod.
 That’s it for Networking in Kubernetes!!!….In next blog I will try to talk about some other interesting insights deeply inside Kubernetes.
Simplify Kubernetes application management with Carvel kapp
Take control of your Kubernetes resources
Introduction:
Kubernetes applications involve juggling multiple resources, configurations, and dependencies. ** Carvel kapp ** offers a straightforward solution to this complexity. It treats related Kubernetes resources as logical “applications,” allowing you to deploy, update, and manage them as cohesive units. With kapp, you can safely apply changes, preview diffs, and prune obsolete resources — all while minimizing disruptions to running workloads.
kapp Overview:
Carvel kapp is a lightweight, command-line tool that simplifies the deployment and management of Kubernetes applications. Unlike some other tools, kapp does not require any server-side components, elevated privileges, or custom resources, making it highly portable and easy to use, even in RBAC-constrained clusters. At its core, kapp is designed to be explicit, providing visibility into the changes it will apply to your cluster before executing them. It calculates the differences between your desired configuration and the live cluster state, presenting a clear set of create, update, and delete operations for your approval. One of kapp’s standout features is its dependency-aware resource ordering. It intelligently manages the deployment order of certain resources, ensuring that dependencies are respected. For instance, Custom Resource Definitions (CRDs) and Namespaces are installed before the resources that depend on them. Additionally, kapp allows you to declare your own dependency rules, such as requiring a Job to complete database migrations before updating a Deployment.
Deploy Kubernetes Applications with kapp:
Before getting too deep, let’s get some basic preparations out of the way: - Create a Kubernetes cluster. - Install ytt kbld kapp by following instructions in Install section on carvel.dev
To get started with our example application, clone kapp-k8s-demo locally:
$ git clone https://github.com/seifrajhi/kapp-k8s-demo.git
$ cd kapp-k8s-demo
This directory contains a simple Go application that consists of main.go (an HTTP web server) and a Dockerfile
Multiple step-* directories contain variations of application configuration that we will use in each step.
$ ls -l
Dockerfile
main.go
config-minimal
Typically, an application deployed to Kubernetes will include Deployment and Service resources in its configuration. In our example, config-minimal/ directory contains config.yml which contains exactly that. (Note that the Docker image is already preset and the environment variable HELLO_MSG is hard coded. We’ll get to those shortly.)
Traditionally, you can use kubectl apply -f config-minimal/config.yml to deploy this application.
However, kubectl does not indicate which resources are affected and how they are affected before applying changes, and does not yet have a robust prune functionality to converge a set of resources.
kapp addresses and improves on several kubectl’s limitations as it was designed from the start around the notion of a “Kubernetes Application” a set of resources with the same label:
- kapp separates change calculation phase (diff), from change apply phase (apply) to give users visibility and confidence regarding what’s about to change in the cluster
- kapp tracks and converges resources based on a unique generated label, freeing its users from worrying about cleaning up old deleted resources as the application is updated
- kapp orders certain resources so that the Kubernetes API server can successfully process them (e.g., CRDs and namespaces before other resources)
- kapp tries to wait for resources to become ready before considering the deploy a success
Let us deploy our application with kapp:
$ kapp deploy -a simple-app -f step-1-minimal/
Target cluster 'https://192.168.99.111:8443' (nodes: minikube)
Changes
Namespace  Name        Kind        Conds.  Age  Op      Op st.  Wait to    Rs  Ri
default    simple-app  Deployment  -       -    create  -       reconcile  -   -
^          simple-app  Service     -       -    create  -       reconcile  -   -
Op:      2 create, 0 delete, 0 update, 0 noop
Wait to: 2 reconcile, 0 delete, 0 noop
Continue? [yN]: y
8:17:44PM: ---- applying 2 changes [0/2 done] ----
8:17:44PM: create deployment/simple-app (apps/v1) namespace: default
8:17:44PM: create service/simple-app (v1) namespace: default
8:17:44PM: ---- waiting on 2 changes [0/2 done] ----
8:17:45PM: ok: reconcile service/simple-app (v1) namespace: default
8:17:45PM: ongoing: reconcile deployment/simple-app (apps/v1) namespace: default
8:17:45PM:  ^ Waiting for generation 2 to be observed
8:17:45PM:    ok: waiting on replicaset/simple-app-7fbc6b7c9b (apps/v1) namespace: default
8:17:45PM:    ongoing: waiting on pod/simple-app-7fbc6b7c9b-g92t7 (v1) namespace: default
8:17:45PM:     ^ Pending: ContainerCreating
8:17:45PM: ---- waiting on 1 changes [1/2 done] ----
8:17:45PM: ongoing: reconcile deployment/simple-app (apps/v1) namespace: default
8:17:45PM:  ^ Waiting for 1 unavailable replicas
8:17:45PM:    ok: waiting on replicaset/simple-app-7fbc6b7c9b (apps/v1) namespace: default
8:17:45PM:    ongoing: waiting on pod/simple-app-7fbc6b7c9b-g92t7 (v1) namespace: default
8:17:45PM:     ^ Pending: ContainerCreating
8:17:49PM: ok: reconcile deployment/simple-app (apps/v1) namespace: default
8:17:49PM: ---- applying complete [2/2 done] ----
8:17:49PM: ---- waiting complete [2/2 done] ----
Succeeded
Our simple-app received a unique label kapp.k14s.io/app=1557433075084066000 for resource tracking:
$ kapp ls
Target cluster 'https://192.168.99.111:8443' (nodes: minikube)
Apps in namespace 'default'
Name        Namespaces  Lcs   Lca
simple-app  default     true  23s
1 apps
Succeeded
Using this label, kapp tracks and allows inspection of all Kubernetes resources created for sample-app:
$ kapp inspect -a simple-app --tree
Target cluster 'https://192.168.99.111:8443' (nodes: minikube)
Resources in app 'simple-app'
Namespace  Name                              Kind        Owner    Conds.  Rs  Ri  Age
default    simple-app                        Deployment  kapp     2/2 t   ok  -   46s
default       simple-app-7fbc6b7c9b          ReplicaSet  cluster  -       ok  -   46s
default         simple-app-7fbc6b7c9b-g92t7  Pod         cluster  4/4 t   ok  -   46s
default    simple-app                        Service     kapp     -       ok  -   46s
default       simple-app                     Endpoints   cluster  -       ok  -   46s
Rs: Reconcile state
Ri: Reconcile information
5 resources
Succeeded
Note that it even knows about resources it did not directly create (such as ReplicaSet and Endpoints).
$ kapp logs -f -a simple-app
Target cluster 'https://192.168.99.111:8443' (nodes: minikube)
# starting tailing 'simple-app-7fbc6b7c9b-g92t7 > simple-app' logs
simple-app-7fbc6b7c9b-g92t7 > simple-app | 2020/12/14 01:17:48 Server started
inspect and logs commands demonstrate why it’s convenient to view resources in “bulk” (via a label). For example, logs command will tail any existing or new Pod that is part of simple-app application, even after we make changes and redeploy.
Deploying configuration changes 
Let’s make a change to the application configuration to simulate a common occurrence in a development workflow. A simple observable change we can make is to change the value of the HELLO_MSG environment variable in [config-step-1-minimal/config.yml](https://github.com/carvel-dev/simple-app-on-kubernetes/blob/develop/config-step-1-minimal/config.yml)
- name: HELLO_MSG
-          value: stranger
+          value: somebody
and re-run kapp deploy command.
The output should highlight several kapp features:
- kapp detected a single change to simple-app Deployment by comparing given local configuration against the live cluster copy
- kapp showed changes in a git-style diff via --diff-changes flag
- since simple-app Service was not changed in any way, it was not “touched” during the apply changes phase at all
- kapp waited for Pods associated with a Deployment to converge to their ready state before exiting successfully
To double check that our change applied, go ahead and refresh your browser window with our deployed application. Given that kapp does not care where application configuration comes from, one can use it with any other tools that produce Kubernetes configuration, for example, Helm’s template command:
$ helm template my-chart --values values.yml | kapp deploy -a my-app -f- --yes
** Until next time 🇵🇸 🎉 **
Thank you for Reading !! 🙌🏻😁📃, see you in the next blog.🤘🇵🇸
🚀 Thank you for sticking up till the end. If you have any questions/feedback regarding this blog feel free to connect with me :
♻️ 🇵🇸 LinkedIn https://www.linkedin.com/in/rajhi-saif/
♻️🇵🇸 Twitter : https://twitter.com/rajhisaifeddine
** *The end * ** ✌🏻
🔰 Keep Learning !! Keep Sharing !! 🔰
References:
[
Deploying Kubernetes Applications with ytt, kbld, and kapp - Carvel
by Dmitriy Kalinin - Dec 13, 2020 TL;DR: ytt, kbld, kapp tools when used together offer a powerful way to create…
carvel.dev ](https://carvel.dev/blog/deploying-apps-with-ytt-kbld-kapp/?source=post_page-----ff0152870a36--------------------------------) [
GitHub - carvel-dev/simple-app-on-kubernetes: K8s simple Go app example deployed with k14s tools
K8s simple Go app example deployed with k14s tools - carvel-dev/simple-app-on-kubernetes
github.com ](https://github.com/carvel-dev/simple-app-on-kubernetes/tree/develop?source=post_page-----ff0152870a36--------------------------------)