Kubernetes, but locally.
Kubernetes Demystified: Building A production-like Local Cluster with Vagrant
Source: opensource.com
My workshop got accepted for the DevOpsDays event which will be held on June 1, 2024. Curious about DevOpsDays, check them out here.
I struggle with some little bit of anxiety when speaking in public, you would literally notice my hands shaking holding the mic. To make this session easier, I decided to write this blog which will serve as a rehearsal for me as well as primer for the session for those who would not be able to attend or would want to go through the reference material later.
Anyway, enough of the intro, let’s get to it…
Ever wanted to experiment with Kubernetes but felt overwhelmed by complex setups? This session dives into a streamlined approach using Vagrant to create your own local Kubernetes cluster which will enable you to practice some advanced Kubernetes concepts.
Disclaimer:
i. We will use the following words interchangeably to mean the same thing
virtual machine/box/node/server
kubernetes/bunch of tools/
container/application instance
application/service
manifest /a file with instructions of what we want the master node to do for us
ii. This piece assumes that you have some little experience with kubernetes and containers. If you’re a total beginner in DevOps, might I suggest my DevOps beginner guide tutorial series.
In today’s DevOps world, hands-on experience with container orchestration tools like Kubernetes is crucial. However, traditional learning materials can be scattered, making it difficult to grasp the bigger picture. This session bridges that gap by providing a clear, step-by-step approach.
By setting up a local cluster with Vagrant, you’ll gain a practical understanding of how Kubernetes works. We’ll walk through the process of deploying applications, allowing you to see how different components interact within the cluster.
This session is ideal for developers, system administrators, and anyone curious about Kubernetes and its role in modern DevOps workflows.
Tools Needed;
- A laptop (CPU: i5>, Ram: 16GB>)
- Vagrant
- A Stable Internet
- A warm glass of white coffee😉
First things first, when we mention Container orchestration, what do we mean? In essence, DevOps is all about trying to manage change and ensure reliability. By change, we mean, when a feature is added and the changes added (notice I didn’t use the word push) to the code in use by clients (notice I didn’t use production code), we should handle any failures that may result from this even before the clients notices that a specific link or function is not working. By reliability, I mean, there should be no downtime due to one issue or the other more notably part of your production infrastructure such as a database server instance going down, sounds a lot to understand, we’ll implicitly unpack this as we proceed.

Credit: CodeProject
How do we achieve reliability? Simple, have more servers each working alongside each other as sort of ready-to-go substitutes. What we achieve by this is, when one server fails, the other ones seamlessly continue with the work.
There’s a term used to explain this, and you’ve heard it somewhere, let me know down in the comments. If you’re learning Kubernetes, I’m sure you know what containers are, and we shall skip explaining. At this point we’re at having multiple containers, serving the same application running at the same time, makes sense?
Imagine you have four applications, with these containers all running;
- backend — 3 containers (node1)
- frontend — 3 containers (node2)
- database — 4 containers (node3) — please don’t put stateful application inside a container
- redis — 2 containers (node4)
How then can we manage all these containers, making sure they’re all up, healthy and running without errors? This is where container management (notice I didn’t use orchestration) tools come in, an example of such, Kubernetes.
I’m not going to lie, learning Kubernetes is not easy, I was there and I remember zoning out during a few lessons, heck I even gave up at some point. If that’s where you are, don’t worry, one step at a time.
Let’s start with the basics, what is Kubernetes. In simple terms, Kubernetes is a collection of tools that you install on a bunch of computers. Right there, we’ve dimestified something, while you can, Kubernetes was not meant to work on one computer. Before I ruffle some feathers here let’s take a step back. We’re saying Kubernetes is essentially a bunch of tools/components you install on several computers, these components include;
- kube-apiserver
- etcd
- kube scheduler
- kubelet
- kube-proxy
- container runtime
I have only listed the basics/core components here, there are more if you dig deeper into how Kubernetes is and how it works under the hood.
Let’s jump into what we’re here for, our goal is to spin up multiple servers, install the Kubernetes components on them making them what we call a Kubernetes cluster then have a look at a few commands. These servers are going to be virtual machines, running locally. We can use just Virtualbox to do this, but I preferred vagrant as it gives me a one-file/repository to set up and manage the virtual machines. In other terms, we refer to this as Infrastructure as Code.
We’ll have a file, which will hold code to spin up our virtual machines, then inject some scripts into this code to install the Kubernetes components. This means, with a single command, we can spin up virtual machines/servers and install Kubernetes components (well, some of them) in the servers— pretty sweet huh!
The complete source code can be found here.
A key characteristic of senior engineers is their ability to effectively implement solutions by independently consulting technical documentation. While I’ll provide a guide to installing Vagrant here, I strongly recommend familiarizing yourself with the official vagrant documentation for a more comprehensive understanding. This will also help you troubleshoot errors in case you ran into any.
In this walkthrough, we’ll focus on installing Vagrant itself and utilizing a Vagrantfile. As mentioned previously, a Vagrantfile defines the configuration for provisioning and managing virtual machines within your development environment. Within the Vagrant ecosystem, virtual machines are commonly referred to as “boxes.” However, this term is not widely used outside of the Vagrant context.
Step one: Installing Vagrant
What environment is ideal? I’m not sure. This project worked well on my laptop with the specs shown below. You can use that as a benchmark to see if your environment will work okay

The script below will have you all set up with Vagrant. If you have other Operating systems, you can find out how to install Vagrant here.
wget -O- https://apt.releases.hashicorp.com/gpg | sudo gpg --dearmor -o /usr/share/keyrings/hashicorp-archive-keyring.gpg
echo "deb [signed-by=/usr/share/keyrings/hashicorp-archive-keyring.gpg] https://apt.releases.hashicorp.com $(lsb_release -cs) main" | sudo tee /etc/apt/sources.list.d/hashicorp.list
sudo apt update && sudo apt install vagrant
Once Vagrant is installed you can verify the installation using the command
vagrant
That’s it with the vagrant installation.
Ad: Learn Python the easy way.
https://youtu.be/LwTh7MDZvh4?si=IYAPOSBDWzW_YyxB
Step 2: Write a vagrantfile
A vagrantfile is the file where we tell vagrant how many machines we want. A file we will be working with is as shown below;
# -*- mode: ruby -*-
# vi: set ft=ruby :

Vagrant.configure("2") do |config|
  config.vm.box = "bento/debian-12"
  config.vm.provider "virtualbox" do |vb|
    vb.memory = 2048
    vb.cpus = 2
  end

  config.vm.define "master" do |node|
    node.vm.hostname = "master"
    node.vm.network "private_network", ip: "192.168.56.10"
    config.vm.network "forwarded_port", guest: 8001, host: 3030, auto_correct:
    config.vm.network "forwarded_port", guest: 80, host: 8080
    config.vm.network "forwarded_port", guest: 3000, host: 3000
    config.vm.synced_folder ".", "/home/vagrant/shared", disabled: false

  end

  config.vm.define "node1" do |node|
      node.vm.hostname = "mode1"
      node.vm.network "private_network", ip: "192.168.56.11"
      config.vm.synced_folder ".", "/home/vagrant/shared"
  end

  config.vm.define "node2" do |node|
    node.vm.hostname = "node2"
    node.vm.network "private_network", ip: "192.168.56.12"
    config.vm.synced_folder ".", "/home/vagrant/shared"
end

  config.vm.provision "shell", name: "disable-swap", path: "scripts/disable-swap.sh", privileged: false
  config.vm.provision "shell", name: "install-essential-tools", path: "scripts/install-essential-tools.sh", privileged: false
  config.vm.provision "shell", name: "allow-bridge-nf-traffic", path: "scripts/allow-bridge-nf-traffic.sh", privileged: false
  config.vm.provision "shell", name: "install-containerd", path: "scripts/install-containerd.sh", privileged: false
  config.vm.provision "shell", name: "install-kubeadm", path: "scripts/install-kubeadm.sh", privileged: false
  config.vm.provision "shell", name: "update-kubelet-config", path: "scripts/update-kubelet-config.sh", args: ["eth1"], privileged: false
end
In the interest of time, we’ll not go through the entire file. The block we need to pay attention to is this;
...
config.vm.define "node1" do |node|
      node.vm.hostname = "node1"
      node.vm.network "private_network", ip: "192.168.56.11"
      config.vm.synced_folder ".", "/home/vagrant/shared"
  end
...
This is how we define a single node — remember a node means a virtual machine/server/box. We give it a hostname, the network and the mounted/shared folder with the host. The last block contains the scripts we want to run inside the node.
...
config.vm.provision "shell", name: "disable-swap", path: "scripts/disable-swap.sh", privileged: false
  config.vm.provision "shell", name: "install-essential-tools", path: "scripts/install-essential-tools.sh", privileged: false
  config.vm.provision "shell", name: "allow-bridge-nf-traffic", path: "scripts/allow-bridge-nf-traffic.sh", privileged: false
  config.vm.provision "shell", name: "install-containerd", path: "scripts/install-containerd.sh", privileged: false
  config.vm.provision "shell", name: "install-kubeadm", path: "scripts/install-kubeadm.sh", privileged: false
  config.vm.provision "shell", name: "update-kubelet-config", path: "scripts/update-kubelet-config.sh", args: ["eth1"], privileged: false
end
These bash scripts basically will install the Kubernetes components and other tools we need to convert our nodes into a Kubernetes cluster. Notice one node has been given the name master and the rest have been given the names node{number}. You can specify as many node{number} as you like and we’ll look at why later.
You might be curious about the naming convention used, with one machine designated as “master” and others named “node1,” “node2,” and so on. As previously mentioned, we’re building a Kubernetes cluster, which is a distributed system composed of multiple servers, typically starting with a minimum of two machines.
Within a Kubernetes cluster, the master node serves as the control plane. It manages the worker nodes, issues instructions for deploying and managing containerized applications, and performs other essential cluster administration tasks. All other servers in the cluster are referred to as nodes, further categorized as either master nodes or worker nodes. Worker nodes, on the other hand, function as the workhorses of the cluster. They passively await instructions from the master node, which typically involve running containerized applications and making them accessible on specific ports.
Wooo! That’s a lot of information, let’s take a coffee break while listening to Coldplay.
Lovely music, isn’t it?
Where were we. We have our vagrantfile ready to define our nodes and we have scripts to install important Kubernetes components and tools, next all we need to do is run this command where our file is.
vagrant up
I’d suggest you clone the Github repository or at least use the folder structure I used.
This is going to take a while since we’re downloading tiny operating systems and installing tools in them. Give it a few minutes and boom, you have your Kubernetes cluster up and ready to go — magic, just like the song! We’re not quite there yet. there are a few tools and configurations — which if I was more brave and had more time would have automated with a script, but I’ll leave that noble cause to you. We will enter these nodes and do the remaining configurations.
Step Three: Connect Master and Worker Nodes
First, let’s start with the master node, to log into the master you basically run
vagrant ssh master
This will open a bash prompt inside our master node. We need to perform a few tasks inside our master node;
sudo kubeadm init --apiserver-advertise-address=192.168.56.10 --pod-network-cidr=10.244.0.0/16
We need to take note of something from the command above; the token and ca-cert gotten after the above command, store the two in a text file. While still inside the master node, let’s run the following commands.
mkdir -p $HOME/.kube
sudo cp -i /etc/kubernetes/admin.conf $HOME/.kube/config
sudo chown $(id -u):$(id -g) $HOME/.kube/config
Last, let’s configure Calico for networking. Hey, you gotta make your cluster fancy huh?
kubectl create -f https://raw.githubusercontent.com/projectcalico/calico/v3.27.0/manifests/tigera-operator.yaml
kubectl create -f ./shared/scripts/helpers/custom-resources.yaml
Our master node is now ready, let’s log into our worker node and make some configurations as well.
Our master node is now ready, let’s log into our worker node and make some configurations as well. The same commands will be ran on each worker node. repetitive I agree, which is why I’m tasking you, my very able reader with automating the process…😉
vagrant ssh node-01
sudo kubeadm join 192.168.56.10:6443 --token <token> --discovery-token-ca-cert-hash sha256:<hash>
What have we done? For a cluster to be functional, the master has to be able to know which nodes she’s in charge of. The second command joins the node to the cluster, quite frankly you can run that command on any computer within the same networking infrastructure as the master and the master will pick it as it’s worker. Hopefully you took note of the token and ca-cert. If you didn’t, don’t worry, You can run the following commands inside the master node and get the token and ca-cert.
kubeadm token list
openssl x509 -pubkey -in /etc/kubernetes/pki/ca.crt | \
   openssl rsa -pubin -outform der 2>/dev/null | \
   openssl dgst -sha256 -hex | sed 's/^.* //'
After you’ve done the same procedure on each worker node, we should have a 3-node Kubernetes cluster running on our local machine — assuming you configured three nodes in total in the vagrantfile.
Step Four: Put our Cluster to work
Now what next? We have our cluster up and running, let’s try to run a few commands to confirm how many nodes we have then run a simple application inside the cluster.
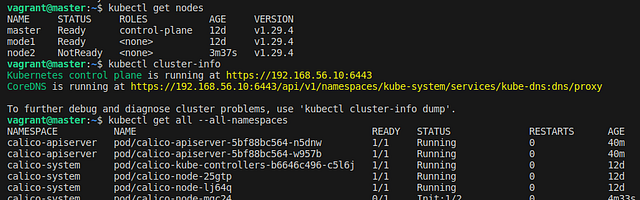
We’ve confirmed that we have three nodes, one master and two worker nodes. We also have a few namespaces and a DNS.
Let’s deploy a simple Frontend instance. To deploy an application to a kubernetes cluster you need two core components; a service and deployment. A deployment specifies the container and its parameters and a service defines how the application can be accessed. In more advanced setup you ill need more components such us a namespace, PersistanctVolumeClaim, Secret etc. In our case, I have combined all these into a single file and named it easymed.yml. This file can reside anywhere, even on the internet and you’ll just specify the url but in our case it is inside our master node in a mounted shared directory;
#shared/shared/master/manifests/easymed.yml

#Namespace
apiVersion: v1
kind: Namespace
metadata:
  name: easymed

---
# Deployment
apiVersion: apps/v1
kind: Deployment
metadata:
  name: easymed
  namespace: easymed
spec:
  replicas: 1
  selector:
    matchLabels:
      app: easymed
  template:
    metadata:
      labels:
        app: easymed
    spec:
      containers:
      - name: easymed
        image: mosesmbadi/easymedfrontend
        ports:
        - containerPort: 3000

---
# Service
apiVersion: v1
kind: Service
metadata:
  name: easymed
  namespace: easymed
spec:
  selector:
    app: easymed
  ports:
  - protocol: TCP
    port: 80
    targetPort: 3000
  type: NodePort
To spin up our easymed instance, we’ll just need to run one command then check if everything is running after a few seconds/minutes
kubectl apply -f shared/shared/master/manifests/easymed.yml
This will take a while since we will download the docker image and run the container. Type the command below after a few minutes

Voila! Our container is running. There’s one challenge though, since our master node tries its best to ensure our application is running inside a pods, which can be born and die any time, it assigns ports on its own. To check which port the application is running on, type the command below.
kubectl get service -n easymed
You can then use the node1 or node2 IP Address and the port to access your application outside the cluster, as shown below;

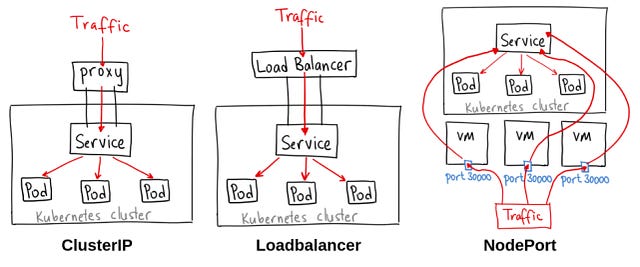
To note here is that our application can be accessed on any Node’s IP (master, node1, node2). In advanced set ups, this is known as Load Balancing, instead of using dynamic cluster ports, we can have one public IP address, then have a Load balancer distribute traffic to each node.
I don’t know about you but I am in a celebratory mood right now. We’ve fired up a Kubernetes cluster and deployed an application to it, that’s no easy feat!

One more thing though, won’t it be nice if we can have real-time metrics of our infrastructure on a web based interface? Let’s set up that, but first, more coffee… ☕
Ad: I went back in time and taught myself how to code in Python. Here’s me teaching myself:
https://www.youtube.com/watch?v=LwTh7MDZvh4
Step Five: Real-time metrics and monitoring
In this section we will install and configure Kubernetes dashboard. As the name suggests, Kubernetes dashboard gives us an interface for monitoring and getting metrics of our cluster. The dashboard can be deployed just like any application. So we start with a file that will tell our master node what we want to do. I’m going to use the file inside /shared/master/management/k8s-dashboard.yml. You can find the file in the Github repository.
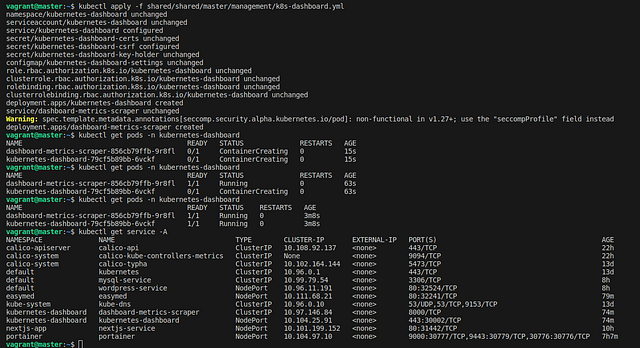
Beautiful. Our dashboard is ready. If you try to access it right now, it will ask your for a token to login, let’s generate that.
Things will get a little bit complicated here. I will try to make it easy for you. A cluster is like a network, think of the network at your office, company, business. There is an admin account, one that your IT guy uses to log into any computer in the office. Who when there is an issue with the network, this admin can log into the management console/interface and fix the issue. That is what we will try to create here, an account for the cluster, get it?
First, let’s start with a component called ServiceAccount and a ClusterRolebinding and we will store the manifest for this in a file called sa-dashboard.yml
#shared/shared/master/management/sa-dashboard.yml
apiVersion: v1
kind: ServiceAccount
metadata:
  name: dashboard-admin
  namespace: kube-system

---
apiVersion: rbac.authorization.k8s.io/v1
kind: ClusterRoleBinding
metadata:
  name: cluster-admin-rolebinding
roleRef:
  apiGroup: rbac.authorization.k8s.io
  kind: ClusterRole
  name: cluster-admin
subjects:
- kind: ServiceAccount
  name: dashboard-admin
  namespace: kube-system
As always, after you’ve written your instructions/manifest, you tell the master node what to do.
kubectl apply -f shared/shared/master/management/sa-dash.yml
After that we run the command below and check of a service account has been created called dashboard-admin
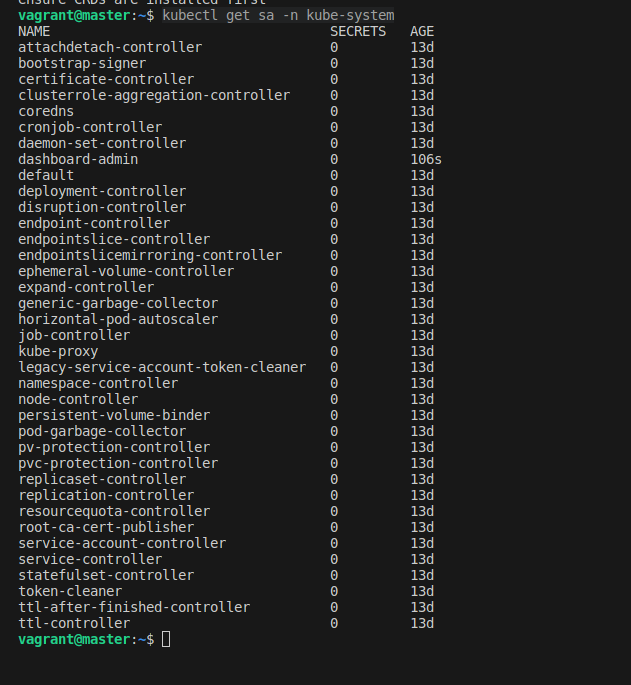
Sweet! Our dashboard-admin ServiceAccount has been created!
Remember that token I mentioned above, now let’s generate it.

A ServiceAccount is basically like a user account, which also requires a password, in our case we use a token. In the command to generate a token, you’ll notice we’ve associated the token with the dashboard-admin ServiceAccount. We can now paste the token into the dashboard token field and access our Kubernetes dashboard.
From the dashboard we can get valuable metrics, metadata and perform various actions.

A word on Networking
I struggled understanding networking in the context of pods, and understanding how our application can be accessed in and outside of the cluster. In the example above, our easymed application is running on port 3000, of the container. However we used <node1-IP>32241, you might ask shouldn’t it be <node1-IP>3000? Let’s explore that in a second. Let’s look at the manifest that gives easymed networking capabilities.
#Namespace
apiVersion: v1
kind: Namespace
metadata:
  name: easymed

---
# Deployment
apiVersion: apps/v1
kind: Deployment
metadata:
  name: easymed
  namespace: easymed
spec:
  replicas: 1
  selector:
    matchLabels:
      app: easymed
  template:
    metadata:
      labels:
        app: easymed
    spec:
      containers:
      - name: easymed
        image: mosesmbadi/easymedfrontend
        ports:
        - containerPort: 3000

---
# Service
apiVersion: v1
kind: Service
metadata:
  name: easymed
  namespace: easymed
spec:
  selector:
    app: easymed
  ports:
  - protocol: TCP
    port: 80
    targetPort: 3000
  type: NodePort
Let’s focus on the service part. We’ve defined a port:80 and also specified the targetPort:3000 and the type of our ports parameter is a NodePort. This is port forwarding at the pod level. The port:80 parameter is the entry point to our application from the pod context. The pod forwards traffic to our container port running at port 3000. Therefore, if other services, within the cluster wants to access our application, all they will care about is port 80 of the pod. The pod itself handles the forwarding to the specific port the service is running on inside the container. This is all within the cluster, what if we want to access the application outside the cluster, this is where the type:NodePort comes in. Kubernetes will create a port for your application on the node and you can access it there, that’s why we’re able to access our easymed on nodeIP:322241. The port is generated randomly from the range 30000–32767, but if you want to use a pre-defined port, you can add the nodePort:30080 as shown below.
Let’s explore this further by adding two containers inside one pod. To achieve this you’ll need to define two services.
apiVersion: v1
kind: Service
metadata:
  name: easymed
  namespace: easymed
spec:
  selector:
    app: easymed
  ports:
  - protocol: TCP
    port: 80
    targetPort: 3000
  type: NodePort

---

apiVersion: v1
kind: Service
metadata:
  name: app2
  namespace: easymed
spec:
  selector:
    app: app2
  ports:
  - protocol: TCP
    port: 80
    targetPort: 3002
  type: NodePort
In this case, the applications will communicate with each other using service-name:80, this is because they are in the same namespace. Now let’s dive deeper and add two other pods on two different namespaces, and see how the communication work.

Let’s break down how the services in the nexty namespace and the easymed namespace will communicate with each other.
Services in the **nexty** Namespace:
- The
nextynamespace contains two services:nextyandapp4. - The
nextyservice exposes port80with atargetPortof3000on its Pods. It also specifies anodePortof30088. - The
app4service exposes port80with atargetPortof3002on its Pods. It also specifies anodePortof30080.
Services in the **easymed** Namespace:
- The
easymednamespace contains two services:easymedandapp2. - The
easymedservice exposes port80with atargetPortof3000on its Pods. - The
app2service exposes port80with atargetPortof3002on its Pods.
Now, let’s discuss how these services can communicate with each other:
Within the Same Namespace:
- Services within the same namespace, such as
nextyandapp4, oreasymedandapp2, can communicate directly using their service names. - For example,
nextyservice can communicate withapp4service usinghttp://app4:80.
Across Different Namespaces:
- Services across different namespaces can communicate by using the fully qualified domain name (FQDN) of the service.
- For example, to communicate from the
nextynamespace to theeasymednamespace, thenextyservice could access theeasymedservice usinghttp://easymed.easymed.svc.cluster.local:80. - The first easymed is the service name, the second easymed is the namespace.
External Access:
- Services can also be accessed externally using the
NodePortassigned by Kubernetes. - For example, the
nextyservice can be accessed externally using<NodeIP>:30088, and theeasymedservice can be accessed using<NodeIP>:<NodePort>(Kubernetes assigns a NodePort automatically).
In summary, services can communicate within the same namespace using their service names, across different namespaces using FQDN, and can be accessed externally using NodePort.
Here’s a recap of what we’ve learnt so far.
A Kubernetes Cluster is a collection of computers with a few components installed on them. Some of this components include; kube-apiserver, etcd, kube scheduler, kubelet, kube-proxy, and container runtime. The computers have identities, a master node and a worker node. A master node is our entry point into the cluster. We give the master node instructions packaged into .yml file also known as manifests. This instructions specify which features of Kubernetes we want to make use of. The instructions can be classified into a few categories/types namely; Service, Deployment, Secret, ServiceAccount, PersistentVolumeClaim, ClusterRoleBinding...
A service gives your application networking capabilities, a Deployment defines what application(container you want to run), a ServiceAccount and ClusterRoleBinding helps you create an account for the cluster. A PersistentVolumeClaim gives your containers/application abilities to request for some storage space from the node.
I have to admit, Kubernetes is not easy to learn and understand in a single seating. You require a lot of hands-on practice, a few sleepless nights and lots of mentoring to understand the core concepts. The strategy I used is to play around with every learning resources I could use. Running a local Kubernetes cluster using Vagrant is certainly not a novel idea as there are plenty of repositories and guides explaining the same. I learnt/and took a lot from those guides as well as the official documentations to be able to launch the cluster and deploy demo applications on my own environment with my own approach. If you’re just getting started I suggest you do lots of practice and ask a lot of questions on forums and on such guides. If you still need a personalized guide, feel free to leave me a chat and we’ll work something out.
If you found this guide helpful and would like to show some love and support free education, feel free to make a donation using these platforms; PayPal Donate, Bitcoin Address.
That’s it for this one. If you have any questions or would like me to clarify anything in this article, feel free to drop a comment below and I will reach out. Stay safe, drink lots of water and tell your daughter, mama, wife, grandpa, grandma, husband, son …… you love them.

The End
Backend Eng, Cloud DevOps Eng, System Administrator || Farmer🐥Donations: www.paypal.com/donate/?hosted_button_id=45A3RRNJMNAGQ