K8s — Understanding K8s Authentication
In the dynamic world of Kubernetes, managing and securing containerized applications is a critical task. Kubernetes, being a leading container orchestration platform, offers robust mechanisms for managing containers at scale.
One of the essential aspects of Kubernetes management is authentication, a process vital for securing your cluster. This article delves into the fundamentals of Kubernetes authentication, aiming to provide Kubernetes engineers with a clear understanding of how it works and why it’s crucial.
What is Kubernetes Authentication?
Authentication in Kubernetes refers to the process of verifying the identity of a user or a process that is trying to access the Kubernetes API. Unlike authorization, which determines what an authenticated user is allowed to do, authentication merely identifies and verifies who that user or process is.
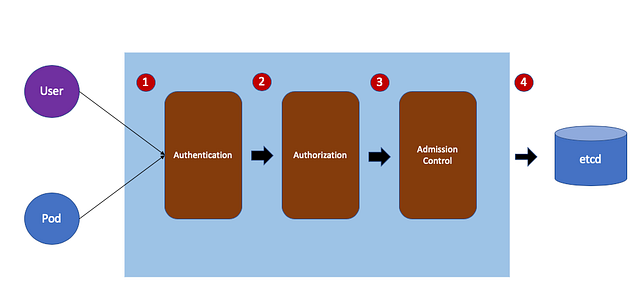
Regardless of whether access to the Kubernetes cluster is via the kubectl client or REST requests, all operations on resources ultimately go through the API Server and are processed via etcd. The entire process, as illustrated in the following diagram, can be divided into four stages:
Authentication
- Purpose: To verify the identity of the user or service making the request.
- Process: This involves presenting credentials like tokens, client certificates, or other forms of identification to the API server.
- Outcome: If the credentials are valid, the identity of the requester is confirmed.
Authorization
- Purpose: To determine if the authenticated user has permission to perform the requested action.
- Process: This stage checks the user’s rights using methods like Role-Based Access Control (RBAC), Attribute-Based Access Control (ABAC), or other custom plugins.
- Outcome: If the user has the necessary permissions, the request is allowed to proceed.
Admission Control
- Purpose: To enforce additional policies on the request before it’s executed.
- Process: This involves a series of admission controllers, which are plugins that intercept requests after they are authenticated and authorized but before they are executed. Examples include resource quota checks, node restrictions, and more.
- Outcome: Requests are either modified as per the policies or rejected if they don’t comply.
API Server to etcd
- Purpose: To persist the changes or retrieve state information from the cluster’s datastore.
- Process: After passing the previous stages, the request is sent to Etcd, the distributed key-value store used by Kubernetes to store all data needed to manage the cluster.
- Outcome: The requested operation (create, read, update, delete) is performed on the cluster’s state data stored in etcd.
These stages collectively ensure that every request to a Kubernetes cluster is authenticated (identity verification), authorized (permission verification), validated and modified as per administrative policies (if necessary), and finally executed and recorded in the cluster’s state database (etcd). This process is fundamental to maintaining the security and integrity of a Kubernetes cluster.
Primary focus
The primary focus of authentication in Kubernetes is to address the issue of whether the source of a request is authorized to access the cluster. Once a request passes through the authentication process, it is considered a legitimate entity. The next crucial step is determining what resources the authenticated entity can access and the actions it can perform on these resources, which is the realm of authorization.
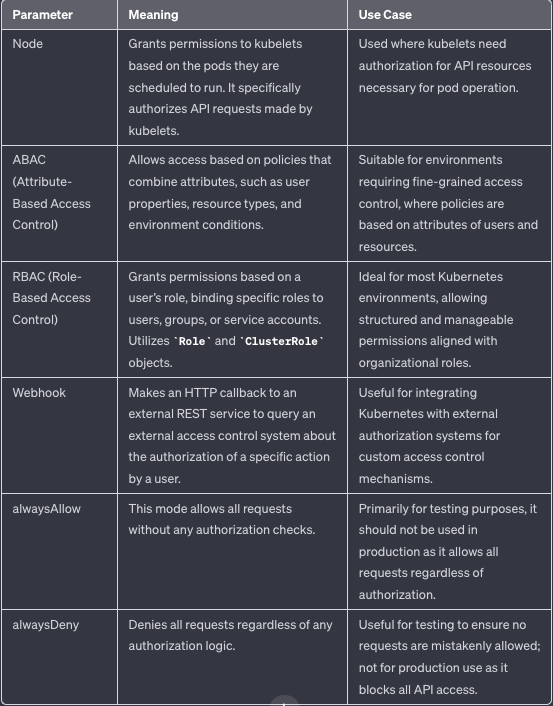
The ultimate goal of authorization is to differentiate between request entities, restrict the scope of their actions, and ensure that they operate with the least privilege necessary to perform their intended tasks. This approach significantly enhances security. There are various methods of controlling permissions, and Kubernetes provides four authorization modes: Node, ABAC (Attribute-Based Access Control), RBAC (Role-Based Access Control), and Webhook.
By default, the authentication modes used by the API server at startup can be examined in the /etc/kubernetes/manifests/kube-apiserver.yaml file.
For example:
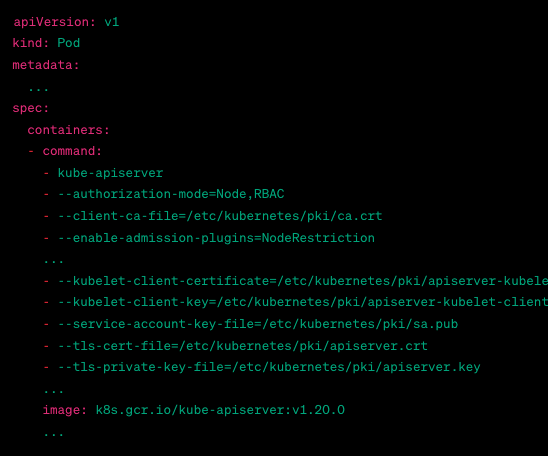
In the above screenshot:
--authorization-mode=Node,RBAC: This line indicates that the API server is using both Node and RBAC (Role-Based Access Control) authorization modes.--client-ca-file,--kubelet-client-certificate,--kubelet-client-key,--service-account-key-file,--tls-cert-file, and--tls-private-key-file: These flags specify the paths to various certificate and key files used for securing and authenticating communications with the API server.
The following table provides a summary of all the parameters for --authorization-mode:
Node Authentication
Node Authentication is a specialized mode of authorization designed to grant permissions to kubelet for making API requests. It allows kubelets to perform API operations, which are divided into read and write actions.
The read actions are scoped to services, endpoints, nodes, pods, and the secrets, configmaps, persistent volume claims (PVCs), and persistent volumes tied to the pods bound to the kubelet node.
The write actions mainly include nodes and node status, pods and pod status, and events. To restrict a kubelet to only modify its own node, the NodeRestriction admission plugin must be enabled when starting the API server.
--enable-admission-plugins=NodeRestriction
Once Node Authentication is enabled, kubelets must use a specifically formatted credential to obtain authorization:
$ openssl x509 -noout -text -in /var/lib/kubelet/pki/kubelet-client-current.pem
Certificate:
    Data:
        Version: 3 (0x2)
        Serial Number: 4096 (0x1000)
    Signature Algorithm: sha256WithRSAEncryption
        Issuer: CN = Kubernetes
        Validity
            Not Before: Jan 1 12:00:00 2021 GMT
            Not After : Jan 1 12:00:00 2022 GMT
        Subject:
            O = system:nodes
            CN = system:node:example-node
        Subject Public Key Info:
            Public Key Algorithm: rsaEncryption
                Public-Key: (2048 bit)
                Modulus:
                    00:d3:7a:...:5b:5b:ef:
                    ...
In this example output:
- Certificate Data: Shows the version and serial number of the certificate.
- Signature Algorithm: The algorithm used for signing the certificate,
sha256WithRSAEncryptionin this case. - Issuer: The entity that issued the certificate, commonly the Kubernetes cluster.
- Validity: The time frame for which the certificate is valid.
- Subject:
- O (Organization):
system:nodes, indicating thekubeletis part of thesystem:nodesgroup. - CN (Common Name):
system:node:example-node, the identifier for the kubelet, whereexample-nodeis the node name.
The kubelet uses a certificate credential, where O=system:nodes indicates its group, and CN=system:node:example-node represents its username. This meets the Node Authentication module's requirement that the group name must be system:nodes and the username must follow the format system:node:<nodeName>.
The <nodeName> is typically provided by default through the hostname or specified by the kubelet --hostname-override option. It must precisely match the hostname provided by the kubelet.
system:nodes is a built-in user group in Kubernetes. We can check it through ClusterRoleBinding:
$ kubectl get clusterrolebinding system:node -o yaml
apiVersion: rbac.authorization.k8s.io/v1
kind: ClusterRoleBinding
metadata:
  name: system:node
roleRef:
  apiGroup: rbac.authorization.k8s.io
  kind: ClusterRole
  name: system:node
subjects:
- apiGroup: rbac.authorization.k8s.io
  kind: Group
  name: system:nodes
We can observe that it points to the system:node ClusterRole, but there are no entries under subjects, indicating that it neither binds to the system:node:example-node user nor to the system:nodes group. This is because Kubernetes relies on the Node Authentication module to restrict kubelets to only read and modify resources on their own nodes, rather than using RBAC for this purpose.
ABAC Authentication
Attribute-Based Access Control (ABAC) in Kubernetes allows for the creation of access policies that can be granted to users or groups. Unlike Role-Based Access Control (RBAC), the policies in ABAC are described using a variety of attributes (such as user attributes, resource attributes, objects, environment, etc.).
To enable ABAC mode, it’s necessary to specify --authorization-mode=ABAC along with --authorization-policy-file=<path to policy file> during the startup of the API server. For example:
apiVersion: v1
kind: Pod
metadata:
  name: kube-apiserver
  namespace: kube-system
spec:
  containers:
  - command:
    - kube-apiserver
    - --authorization-mode=ABAC
    - --authorization-policy-file=/etc/kubernetes/policies/abac-policy.json
    - // other flags...
    image: k8s.gcr.io/kube-apiserver:v1.20.0
    // other container settings...
and sample policy:
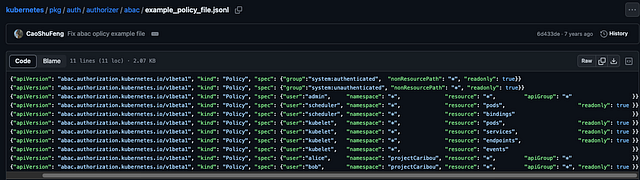
Pic from
In an ABAC (Attribute-Based Access Control) policy file for Kubernetes, each line is a JSON object. The version control attribute "apiVersion": "abac.authorization.kubernetes.io/v1beta1" and "kind": "Policy" are standard fields used by Kubernetes for version control and future conversions.
For example:
{"apiVersion": "abac.authorization.kubernetes.io/v1beta1", "kind": "Policy", "spec": {"group":"system:unauthenticated", "nonResourcePath": "*", "readonly": true}}
The given policy allows read-only access to all non-resource paths for any unauthenticated requests within the Kubernetes cluster. It’s a way of saying that unauthenticated users can access certain non-resource URLs (like API documentation or health status) but can’t modify anything or access core Kubernetes resources.
Although ABAC provides a way to categorize user access, adding new ABAC policies requires restarting the API Server for them to take effect. The granularity of access control in ABAC is limited to specifying read-only permissions, which may not suffice as the number of users grows. For larger organizations needing more fine-grained management, Kubernetes’ RBAC (Role-Based Access Control) authorization module becomes essential.
RBAC Authentication
Compared to other access control methods, RBAC (Role-Based Access Control) in Kubernetes offers the following advantages:
- It provides comprehensive coverage for both resource and non-resource permissions within the cluster.
- RBAC is implemented through several API objects. Like other API objects, these can be managed and adjusted using `kubectl` or the API, eliminating the need to restart the ApiServer.

Pic from dynatrace
Kubernetes RBAC primarily addresses the issue of defining the roles of various subjects (or entities) within the cluster. In Kubernetes, these subjects include users (such as Users, Groups, typically interacting via the kubectl command) and service accounts.
Roles determine the permissible operations on resources, and in RBAC, we can define both namespace-level Roles and cluster-level ClusterRoles. Kubernetes then associates users with roles through RoleBindings and ClusterRoleBindings, where RoleBinding can bind to both Roles and ClusterRoles, while ClusterRoleBinding is specifically for ClusterRoles.
This system allows for specific control over different users performing certain operations on various resources. Roles are specific to a namespace, whereas ClusterRoles are effective across the entire cluster, thus having a broader scope of access, including the ability to restrict access to resources like Nodes.
Webhook Authentication
Enabling Webhook mode in Kubernetes is similar to enabling ABAC mode. It involves specifying certain parameters during the startup of the apiserver.
Specifically, you need to set --authorization-mode=Webhook and provide an HTTP configuration file to define the policy. This is done through the --authorization-webhook-config-file=<path to policy file> parameter. The format of the policy file follows the kubeconfig file structure.
Webhook Configuration File
# webhook-authentication-config.yaml
apiVersion: v1
kind: Config
clusters:
- name: webhook
  cluster:
    server: https://webhook-server.example.com/authenticate
    certificate-authority: /path/to/ca.pem # Path to CA cert for the webhook server
users:
- name: apiserver
  user:
    client-certificate: /path/to/client/cert # Path to cert for authenticating to the webhook server
    client-key: /path/to/client/key # Path to key for authenticating to the webhook server
current-context: webhook
contexts:
- context:
    cluster: webhook
    user: apiserver
  name: webhook
During the authentication process, the API server generates a JSON object that describes the action being taken. For a request involving a resource type, the content of this JSON object primarily includes details about the resource being accessed or the characteristics of the request.
When the Kubernetes API server makes a call to a webhook for authentication or authorization, it sends a JSON payload that describes the request. Below is an example of a sample webhook request that the API server might send:
{
  "apiVersion": "authentication.k8s.io/v1beta1",
  "kind": "TokenReview",
  "spec": {
    "token": "eyJhbGciOiJSUzI1NiIsInR5cCI6IkpXVCJ9.eyJpc3MiOiJodHRwczovL2V4YW1wbGUuY29tIiwic3ViIjoiYWRtaW4iLCJhdWQiOiJrdWJlcm5ldGVzIiwiaWF0IjoxNjE1NTQ4ODIyLCJuYmYiOjE2MTU1NDg4MjIsImV4cCI6MTYxNTU1MjQyMiwibmFtZXNwYWNlcyI6WyJkZWZhdWx0Il19.cKj2HqUMY6mJ4H9mIb7G..."
  }
}
In this example:
apiVersion: Specifies the version of the Kubernetes authentication API being used.kind: Indicates the kind of object, which in this case is aTokenReview. This object is used for token authentication in Kubernetes.spec:token: Contains the actual token that needs to be authenticated. This token is typically a JWT (JSON Web Token) and represents the credentials used to authenticate the request to the Kubernetes API.
The webhook server, upon receiving this request, is expected to validate the token. It then returns a response indicating whether the token is valid and, if so, the associated user information. The response would look something like this:
{
  "apiVersion": "authentication.k8s.io/v1beta1",
  "kind": "TokenReview",
  "status": {
    "authenticated": true,
    "user": {
      "username": "admin",
      "uid": "42",
      "groups": ["system:masters"]
    }
  }
}
Conclusion
Authorization primarily addresses the question of “who can perform which operations on what resources.” Kubernetes has four main authorization modules, which operate in the second stage of the authentication and authorization process.
- The Node module is tailored for scenarios where kubelets need access to the APIServer;
- ABAC mainly targets regular users like Users and Groups, offering relatively coarse control;
- RBAC can be used for both regular users and ServiceAccounts, providing very fine-grained control and is the commonly used method of authorization in Kubernetes;
- Webhook is used for custom authorization logic, suitable for centralized, cross-cloud authorization scenarios.
More from Tony
Recommended from Medium
[
See more recommendations
](https://medium.com/?source=post_page---read_next_recirc--319de666b8d8---------------------------------------)