Docker Beginner to Expert Tutorial
D ocker has revolutionized the way we develop, ship, and run applications. It enables developers to package applications into containers — standardized executable components that combine application source code with the operating system (OS) libraries and dependencies required to run that code in any environment. This article will teach you docker key concepts, installation, commands, building images, managing containers, networking, data persistence, and a few other advanced topics.
So, let’s dive right into it. But wait before learning about docker you need to first learn about containers/Containerization.
Not a medium member, don’t worry I got you covered. Read it from below link- https://levelup.gitconnected.com/docker-beginner-to-expert-tutorial-68555aa3e544?source=friends_link&sk=65e93fdf27755dae838bcf929874d6a8
Containers and Containerization
What Are Containers?
Containers are lightweight, standalone, and executable software packages that include everything needed to run a piece of software, including the code, runtime, system tools, libraries, and settings. Containers isolate software from its environment and ensure that it works uniformly despite differences for instance between development and staging. This means that they allow you to package an application, along with all its dependencies and libraries, into a single unit that can be run on any machine with a container runtime, such as Docker.
What is Containerization?
Containerization is the process of packaging software code along with its dependencies so it can run uniformly and consistently on any infrastructure. This method ensures that applications can be deployed easily and run reliably when moved from one computing environment to another.
Benefits of Containerization
- Consistency: Applications behave the same regardless of where they run.
- Efficiency: Containers are lightweight and share the host OS kernel, using less system resources than virtual machines.
- Scalability: Easily scale applications up and down as application size grows gradually.
- Isolation: Each container runs in its isolated environment, improving security and stability.
What is Docker?
Docker is an open-source platform that enables developers to build, deploy, run, update, and manage containerized applications easily and efficiently. Here are some key reasons for Docker’s popularity:
Docker streamlines the development workflow, reduces the “it works on my machine” problem, and allows for efficient deployment and scaling of applications.
Key Benefits of Docker:
- Portability: Applications run the same, regardless of where they are deployed.
- Scalability: Easily scale applications up or down based on demand.
- Isolation: Containers encapsulate an application and its dependencies, ensuring that they run independently of each other.
History of Docker
Docker was first released in March 2013 by DotCloud (now Docker, Inc.). The idea behind Docker was to create a lightweight, portable, and efficient way to package and run applications consistently across different environments. This was inspired by the shipping container concept, where applications and their dependencies are packaged into standardized containers that can be easily moved and deployed.
Today, Docker is widely adopted across various industries and is supported by a large and active community of developers and contributors. It has become a foundational technology for containerization and has sparked the growth of other related technologies, such as Kubernetes for container orchestration.
Getting Started with Docker
Before diving into Docker, you need to install it on your system. Docker is available for multiple platforms including Windows, macOS, and Linux.
Installing Docker
Follow the instructions for your operating system on the official website.
After installation, verify Docker is running:
docker — version
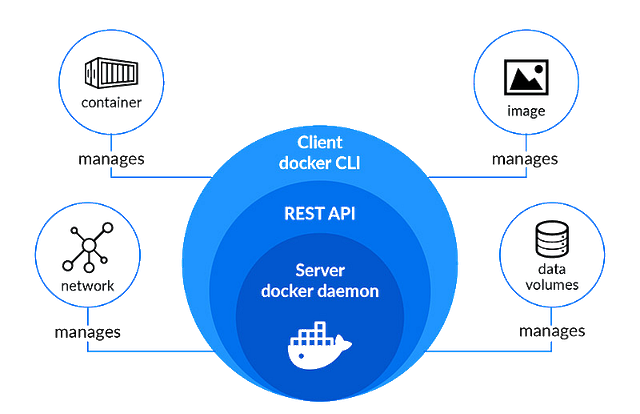
Docker Architecture
Understanding Docker’s architecture:
Docker Components
Docker uses a client-server architecture with several key components:
- Docker Client: The command-line interface (CLI) tool that allows users to interact with Docker. It communicates with the Docker daemon to execute commands.
- Docker Daemon (or Docker Engine): Docker Engine is an open-source containerization technology that allows developers to package applications into containers. Containers are standardized executable components combining application source code with the operating system (OS) libraries and dependencies required to run that code in any environment. It listens to Docker API requests and processes them accordingly.
- containerd: A core component that manages the lifecycle of containers, including starting, stopping, and managing container processes.
- runc: A lightweight CLI tool for creating and running containers according to the Open Container Initiative (OCI) specification.
- Docker Registry: A service that stores and distributes Docker images. Docker Hub is the default public registry, but private registries can also be used. It is similar to github, but it lets you push images rather than source code.
- Docker Networking: Provides networking capabilities for containers, allowing them to communicate with each other and the outside world.
- Docker Volumes and Bind Mounts: Enable data persistence and sharing between containers and the host system.
- Docker Compose A tool for defining and running multi-container applications using a YAML file.
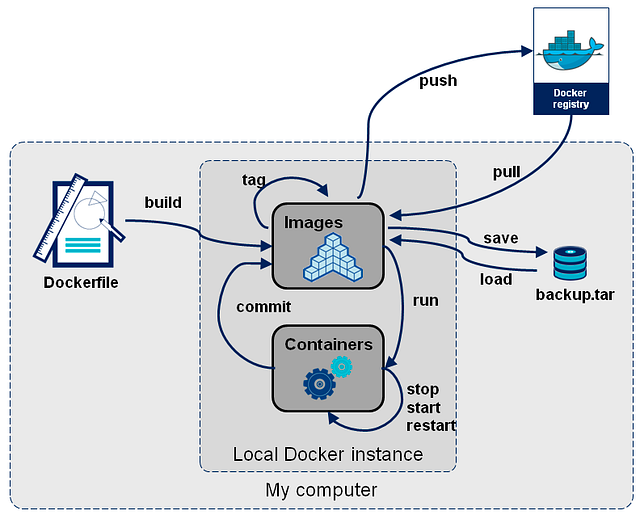
How Docker Runs Applications
- Build: The Docker client sends a build request to the Docker daemon, which creates an image based on the instructions in the
Dockerfile. - Ship: The image is stored in a Docker registry (public or private) from where it can be downloaded and shared.
- Run: The Docker client requests the Docker daemon to create and run a container based on the image.
Docker Images
A Docker image is a lightweight, standalone, executable package that includes everything needed to run a piece of software, including the code, a runtime, libraries, environment variables, and config files.
Pulling Docker Images
You can pull images from Docker Hub:
docker pull hello-world
After pulling the image you can easily run the images using the docker run command.
The difference between docker image and container can be visualized as imagine that a container is when you run node app.js on your machine from some source code you got from github and image is your codebase on github.
Basic docker commands —
1.) Check Docker Version
docker version
2.) View System-Wide Docker Information
docker info
3.) List All Docker Images
docker images
4.) List Running Containers
docker ps

docker ps -a      // List All Containers (Running and Stopped)
5.) Pull an Image from a Registry
docker pull node:20 // Here 20 specifies a specific version of the node we want to pull
6.) Create and Start a New Container from an Image
in the below example we are deploying an NGINX server in detached mode(-d), mapping host port 8080 to container port 80.
docker run -d -p 8080:80 nginx
7.) Stop a Running Container and remove it
docker stop <container_id>

docker rm <container_id>                // Remove a Stopped Container
8.) Remove an Image
docker rmi <image_id>
9.) Build the Docker Image
docker build -t <your-image-name> .
10.) Pushing image to Registry
docker push <Name of the image> <Name of the repo>
Docker Port Mapping Explained
Port mapping in Docker is the process of mapping a port on the host machine to a port in the container. This is essential for accessing applications running inside containers from outside the Docker host.
How Port Mapping Works
Imagine you have a web server running inside a Docker container on port 3000. By default, this port is only accessible within the Docker network and not from your host machine or the external network.
To make this server accessible outside the container, you need to forward a port from the host to the container.
Example:
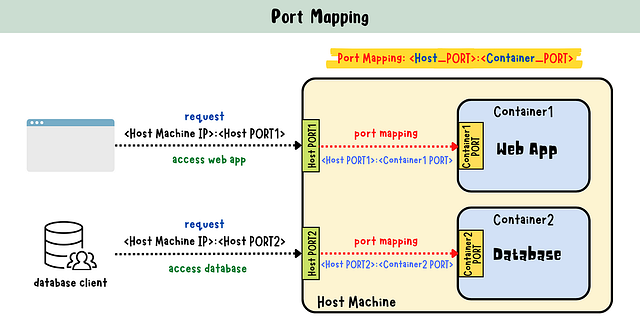
docker run -p [HOST_PORT]:[CONTAINER_PORT] [IMAGE-NAME]
*-p* is the flag used to specify port mapping.
Dockerfile
A Dockerfile is a text file that contains a series of instructions on how to build a Docker image. Each instruction creates a layer in the image, and the layers are cached to speed up future builds.
Key Instructions in a Dockerfile
- FROM: Sets the base image for the subsequent instructions.
- WORKDIR: Sets the working directory inside the container.
- COPY: Copies files from the host system to the container.
- RUN: Executes a command in the container.
- CMD: Specifies the command to run when the container starts.
- EXPOSE: Documents which ports the container listens on.
.dockerignore
A .dockerignore file works similarly to a .gitignore file. It specifies which files and directories should be ignored when building a Docker image. This helps in keeping the image lightweight and avoiding unnecessary files. This reduces the size of the build context and improve build times. Add node_modules, dist folders etc etc.
How to build a docker image?
We’ll take the example of dockerizing a basic mongo-express typescript app.
1.) Initialize the Project
mkdir ts-express-app
cd ts-express-app
npm init -y

npm install express mongoose dotenv
npm install --save-dev typescript @types/node @types/express @types/mongoose ts-node
tsc --init
2.) Create tsconfig.json
{
    "compilerOptions": {
        "target": "ES6",
        "module": "commonjs",
        "outDir": "./dist",
        "rootDir": "./src",
        "strict": true
    }
}
3.) Create src/index.ts
import express from 'express';
import mongoose from 'mongoose';
import dotenv from 'dotenv';

dotenv.config();

const app = express();
const PORT = 3000;
const DB_URL = process.env.DATABASE_URL || '';

mongoose.connect(DB_URL, { useNewUrlParser: true, useUnifiedTopology: true })
    .then(() => console.log('Connected to MongoDB'))
    .catch(err => console.error('Could not connect to MongoDB', err));

app.get('/', (req, res) => {
    res.send('Ram Ram bhai Sareya Ne');
});

app.listen(PORT, () => {
    console.log(\`Server is running on port ${PORT}\`);
});
4.) Create package.json file and a.env file
"scripts": {
    "start": "node dist/index.js",
    "build": "tsc"
}
DATABASE_URL=mongodb://localhost:27017/ts-express-app
Now let’s dockerise it.
5.) Create a **Dockerfile** in the root of your project
# Use the Node.js 20 image as the base image
FROM node:20

# Set the working directory inside the container
WORKDIR /usr/src/app

# Copy package.json and package-lock.json
COPY package*.json ./

# Install dependencies
RUN npm install

# Copy the rest of the application code
COPY . .

# Build the TypeScript code
RUN npm run build

# Expose the port the app runs on
EXPOSE 3000

# Command to run the app
CMD ["npm", "start"]
6.) Create a **.dockerignore** file in the root of your project:
node_modules
dist
npm-debug.log
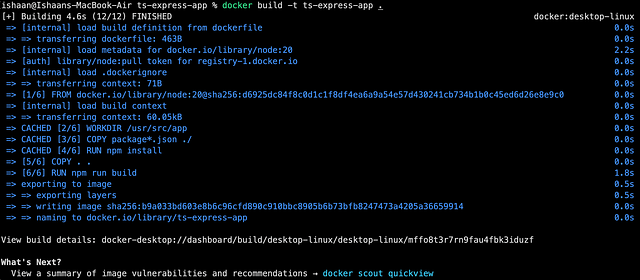
7.) Building the Docker Image
docker build -t ts-express-app .
The above command should successfully run and will give an output similar to below:
8.) Running the Docker Container
After the image is built, you can run a container from it using the following command:
docker run -p 3000:3000 ts-express-app
Like i previously stated, the above runs your container and maps port 3000 on your host machine to port 3000 of the container. You can visit your localhost:3000 and can see the container running successfully.
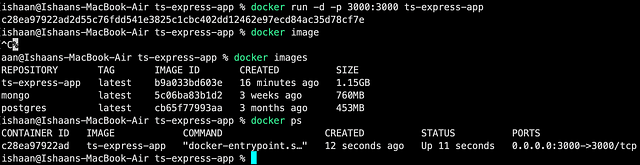
In the above image, you can see my image is listed in docker images and I can see the container running on port 3000 which is mapped with machine port 3000. Spend some time here to play around and analyse what is happening here. Also in the above commands I have used something extra which I didn’t explain earlier. It’s your homework to find it out and learn about it. If you have found it then comment it in the comment section with a proper explanation of it:)
Now moving on, you can push the image to the docker hub registry with 3 simple commands —
9.) Pushing the Image to a Docker Registry
docker login
docker tag ts-express-app your-dockerhub-username/ts-express-app:latest
docker push your-dockerhub-username/ts-express-app:latest
In above enter your dockerhub username inplace of “your-dockerhub-username”. I have used an expression tag which i’ll explain later, for now just bear with me!
Congrats for pushing your first image to dockerhub. Now I believe you have become familiar with the basics of building images and running containers, let’s deep dive into more of it.
Now in production mode you hide your.env file to secure your secrets. So how to tell these secrets in your.env to docker without using.env file.
Simply use “-e” flag to which let’s you send in environment variables to your app.
docker run -p 3000:3000 -e DATABASE_URL=mongodb://localhost:27017/ts-express-app ts-express-app
Docker Tags
Docker tags convey useful information about a specific image version/variant. Tags allow you to identify and pull different versions of an image from a Docker registry. They are aliases to the ID of your image which often look like this: f1477ec11d12. It’s just a way of referring to your image. A good example is how Git tags refer to a particular commit in your history.
The general syntax for tagging a Docker image is:
docker tag SOURCE_IMAGE[:TAG] TARGET_IMAGE[:TAG]
If no tag is specified, Docker uses the *latest* tag by default.
The two most common cases where tags come into use are:
- When building an image, we use the following command:
docker build -t username/image_name:tag_name .
2. Explicitly tagging an image through the tag command.
docker tag SOURCE_IMAGE[:TAG] TARGET_IMAGE[:TAG]
-
Version Management: Tags are commonly used to indicate different versions of an image. For example, you might have tags like
1.0,1.1,2.0, etc., representing major or minor version updates. -
Environment or Stage Identification: Tags can help differentiate between development, staging, and production environments. For example, you might have tags like
dev,staging, andprod. -
Architecture or Platform Identification: Tags can identify images built for different architectures or platforms, such as
amd64,arm64, orwindows.
Let’s understand it more by using tag in commands—
- Build a Docker Image using a tag:
docker build -t express-mongo-app:1.0 .
2. Pulling a Specific Tag:
docker pull node:14.18.0
3. Tag an existing image with a new tag:
docker tag express-mongo-app:1.0 express-mongo-app:latest
4. Managing Versions using tag:
Using semantic versioning (MAJOR.MINOR.PATCH) —
docker build -t express-mongo-app:1.0.0 .
docker tag express-mongo-app:1.0.0 express-mongo-app:1.0
docker tag express-mongo-app:1.0.0 express-mongo-app:latest
Docker exec command
The docker exec command allows you to run commands inside a running Docker container. This can be useful for debugging, running admin tasks, creating folder/volumes or inspecting the state of the container.
Basic docker exec usage
docker exec [OPTIONS] CONTAINER_ID|CONTAINER_NAME COMMAND [ARG…]
-it for interactive mode.
- CONTAINER: The name or ID of the container.
- COMMAND: The command you want to run inside the container.
- [ARG…]: Arguments for the command.

This will open an interactive Bash shell inside the running container. You can then run commands, inspect files, create/remove volumes or execute scripts within the container’s environment.
The -it option in docker exec stands for "-interactive -tty", which allows you to interact with the container's shell.
Now you’ll be wondering what volumes are that i mentioned above. Let’s dive into it —
Docker Volumes
Docker volumes are file systems that are mounted on Docker containers to preserve the data generated by the container.
What is the Docker File System?
A Docker container executes the software stack specified in a Docker image. Images are built up of read-only layers that operate on the Union File System. When we start a new container, Docker adds a read-write layer on top of the image layers, allowing the container to function like a conventional Linux file system. So, each file modification within the container generates a functioning copy in the read-write layer. However, when the container is stopped or removed, the read-write layer disappears.
Docker manages volumes kept in a section of the host filesystem (/var/lib/docker/volumes on Linux). This portion of the filesystem shouldn’t be altered by non-Docker processes. In Docker, volumes are the most effective way to store data. Using the docker volume create command, we may directly create a volume, or Docker can do it for us when it creates a container or service.
There are three main types of volumes:
- Named Volumes: Managed by Docker and stored in a location on the host’s filesystem.
- Bind Mounts: Mounts a directory or file from the host machine into the container. On the host system, bind mounts can be kept anywhere. These might be crucial system folders or files. They are always modifiable by non-Docker processes running on a Docker host or in a Docker container. Comparatively speaking, bind mounts are less useful than volumes.
- tmpfs Mounts: Mount a temporary file system into the container, stored in the host’s memory. These mounts are never written to the host system’s filesystem; instead, they are kept solely in the memory of the host system. Neither on the Docker host nor in a container is it stored on a disc. Sensitive or non-persistent state data can be stored on the tmpfs mount for the duration of the container.
Named Volumes:
Creating a named volume using below command:
docker volume create my-ts-app-data
Now, let’s mount the volume to the directory inside the container. We’re mounting the my-ts-app-data volume to the /app/data directory inside the container. Any data written to /app/data inside the container will be stored in the named volume on the host.
docker run -d -p 3000:3000 -e DATABASE_URL=mongodb://mongo:27017/ts-express-app -v my-ts-app-data:/data/db ts-express-app

Use docker volume inspect “my-ts-app-data”, command to show your details about the volume, including its location on the host filesystem.
To remove a volume when it’s no longer needed, just use “rm” command.
docker volume rm my-ts-app-data
Working of volumes in docker
Now, let’s try something new. Let’s say i want to visualize my data in mongoDB compass app. But how do i connect it to my volume in container?
Start the mongo container locally by running below command —
docker run -p 27017:27017 -d mongo
Open your mongoDB compass and connect to 27017 port. Create a database and collection and insert some data in it and save it.

Added a new DB and some random data into it.
Now kill the container and then restart it. Open the mongoDB compass and check the DB and data we created before. What do you see? It’s gone, right.

So how do we persist data? you guessed it right. Using volumes!
We have already created a volume before named “ my-ts-app-data”, let’s use that only. Mount the volume in the mongo container’s /data/db directory and run it now using below command.
docker run -d -v my-ts-app-data:/data/db -p 27017:27017 mongo
Now repeat the steps above, create a DB add data in it. Kill container, restart it and recheck the data you previously input. You’ll see your data is persisted!
Now, since we have learnt about named volumes, let’s dive into some core docker topics now. As you noticed above, i have used the word “layers” while explaining docker volumes. But what is a layer? Let’s see it…
I have left Bind mount and tmpfs mount for now, we’ll learn about it later in this article.
Layers In Docker
So far we know that the Docker build consists of a series of ordered build instructions. Each instruction in a Dockerfile roughly translates to an layer also called as image layer. When you create a new container from an image, a new writable layer is added on top of the image layers, allowing the container to make changes without modifying the underlying image layers.
What are Docker Layers?
- Base Layer: It is the starting point of your Docker image. It contains a operating system, such as Ubuntu, Alpine etc etc (whatever ur dockerfile specifies). This layer is immutable and serves as the foundation for subsequent layers.
- Intermediate Layers: These layers represent the instructions in your Dockerfile, such as
RUN,COPY, andADD. Each instruction creates a new layer on top of the previous ones. Intermediate layers are read-only and cached. - Top Read/Write Layer: When you run a container from an image, Docker adds a writable layer on top of the read-only image layers. This allows the container to make changes without modifying the underlying image.
- Reusable & Shareable: Layers are cached and reusable across different images, which makes building and sharing images more efficient. If multiple images are built from the same base image or share common instructions, they can reuse the same layers, reducing storage space and speeding up image downloads and builds.
How Layers are Created
Layers are created based on the instructions specified in the Dockerfile. Each instruction in the Dockerfile generates a new layer on top of the previous layers. Here’s an example Dockerfile —
FROM ubuntu: 18.04      // This instruction creates a base layer by pulling the ubuntu: 18.04 image from the Docker registry.

COPY . /app            // This instruction creates a new layer on top of the base layer. It copies the entire contents of the build context (the directory containing the Dockerfile) into the /app directory inside the container.

RUN make /app          // This instruction creates another layer by running the make /app command inside the container. This command builds the application located in the /app directory.

CMD python /app/app.py  // This creates a new layer and specifies the default command to run when the container starts, which is python /app/app.py.
In above we can see that, each of the instructions creates a new layer on top of the previous ones, forming a stack of layers that make up the final Docker image. For more visualization, you can refer to below image to see what is actually going on here.

Image representation of layers
Layer Caching
When we build a Docker image using a Dockerfile, Docker processes each instruction sequentially and creates a new layer for each one. If a layer of an image is unchanged, then the docker builder picks it up from the build cache. If a layer has changed since the last build, that layer, and all layers that follow it, must be rebuilt. Let me explain it using an example —

Building image for first time

Building image for second time with minor changes in app.js file
As you can see in above attached screenshots, In first image i have build my express app to an image and we can see every layer is built from scratch. Now i made a minor change(just added a *console.log('hi')* in app.js file and now iam rebuilding the image. So now in second image you can see layer 2,3,4 is cached since there is no change in them, but since there was a change in a file, docker acknowledges that change and hence layer 5 isn’t cached and is build from scratch. And since the layer 5 is changed, all the layers that are build upon it (after it) will be rebuild from scratch.
Note: the layer 1 in image 2 is still cached even though it still doesn’t show it is cached in the screenshot. I actually don’t why, let me know in the comments if you find it out. But don’t worry it is cached though.
So now you have had a pretty good knowledge of dockerizing an application and how does it’s internal works as well as layers in docker. Now take a pause before moving forward, tinker around with volumes, creating them and accessing them within your software. Also play with your dockerfile using multiple tech stack based applications by building them and rebuilding them. Try optimizing the dockerfile to reduce steps/layers and maximise the use of cached layers to improve efficiency.
Docker Networks
Docker containers canʼt talk to each other by default. Hence docker networks allow containers to communicate with each other and the outside world. They enable isolation, security, and control over the communication between Docker containers.
Types of Docker Networks
Docker provides several types of networks:
1. Bridge Network:
The default network type for standalone containers. Bridge networks create a software-based bridge between your host and the container. Containers connected to the network can communicate with each other, but they’re isolated from those outside the network. Each container in the network is assigned its own IP address. Because the network’s bridged to your host, containers are also able to communicate on your LAN and the internet. They will not appear as physical devices on your LAN, however.
2. Host Network:
Containers that use the host network mode share your host’s network stack without any isolation. They aren’t allocated their own IP addresses, and port binds will be published directly to your host’s network interface. This means a container process that listens on port 80 will bind to
3. Overlay Network:
Overlay networks are distributed networks that span multiple Docker hosts. The network allows all the containers running on any of the hosts to communicate with each other without requiring OS-level routing support. Overlay networks implement the networking for Docker Swarm clusters, but you can also use them when you’re running two separate instances of Docker Engine with containers that must directly contact each other. This allows you to build your own Swarm-like environments.
4. Macvlan Network:
Macvlan is another advanced option that allows containers to appear as physical devices on your network. It works by assigning each container in the network a unique MAC address. This network type requires you to dedicate one of your host’s physical interfaces to the virtual network. The wider network must also be appropriately configured to support the potentially large number of MAC addresses that could be created by an active Docker host running many containers.
5. ipvlan:
IPvLAN is an driver that offers precise control over the IPv4 and IPv6 addresses assigned to your containers, as well as layer 2 and 3 VLAN tagging and routing. This driver is useful when you’re integrating containerized services with an existing physical network. IPvLAN networks are assigned their own interfaces, which offers performance benefits over bridge-based networking.
6. None Network:
Containers that are isolated and do not have network interfaces.
Let’s try to make containers talk to each other.
Create a network using below command (by default it is a bridge network): —
When you run a container without specifying a network, it’s attached to a bridge network.
docker network create my-first-network
docker network ls
Run Containers on the Bridge Network —
docker run -d --name c1 --network my-first-network nginx
docker run -d --name c2 --network my-first-network nginx
Now let’s connect container 1 to container 2, we will go inside the c1 and then ping c2
docker exec -it c1 /bin/bash
ping c2
you can see it working. Now let’s try something new. I will run mongo in a container and my express app in another container and then try to access the mongo container through my express app. Use same express app code that we created before, just in the.env file put below —
DATABASE_URL=[container_name]://mongodb:27017/ts-express-app-db

DATABASE_URL=mongodb://mongodb:27017/ts-express-app-db
docker run -d --name mongodb --network my-first-network -v my-ts-app-data:/data/db -p 27017:27017 mongo

docker run -d -p 3000:3000 --network my-first-network -e DATABASE_URL='mongodb://mongodb:27017/ts-express-app-db' ts-express-appYou can see both container up, now try adding some data using postman or curl command in your terminal. You will see a success response, to confirm that the data is in mongodb, you can go inside the container and run below mongo commands.
docker exec -it mongodb mongo
use mydatabase
db.users.find().pretty()
You can also check container logs for mongoDB to confirm the data is stored or not.
Remove a network —
docker network rm my-first-network

# remove all unused network (networks that aren't connected to even a single container)
docker network prune
Disconnect a container from a network —
docker network disconnect my-first-network mongodb
Docker Compose
Docker Compose is a tool that allows you to define and run multi-container Docker applications. It uses a YAML file (docker-compose.yml) to configure and orchestrate the services that make up your application, including their dependencies, networking, volumes, and other configuration settings.
Example of docker-compose.yml file for our express app that we have been using till now —
version: '3.9'

services:
  ts-express-app:
    build: .
    image: "express-mongo-ts-docker"
    container_name: ts-express-app
    ports:
      - "3000:3000"
    environment:
      - MONGO_URL=mongodb://mongodb:27017/ts-express-app-db
    depends_on:
      - mongodb

  mongodb:
    image: mongo
    container_name: mongodb
    volumes:
      - my-ts-app-data:/data/db
    ports:
      - "27017:27017"

volumes:
  my-ts-app-data:
Let’s learn by explaining line by line what above file means —
1.) Version Declaration:
version: '3.9': Specifies the version of the Docker Compose file format.
2.) Services:
A service is a unit of deployment that defines which container image to use. I have defined 2 services in our file above —
a.) ts-express-app
This service defines our Express app.
build: .: Builds the Docker image from the Dockerfile in the current directory.image: "express-mongo-ts-docker": Names the image asexpress-mongo-ts-docker. (It is optional to add this)container_name: ts-express-app: Sets the container name tots-express-app.ports: - "3000:3000": Port mapping as usual, no need to explain.environment: - MONGO_URL=mongodb://mongodb:27017/ts-express-app-db: Sets the environment variableMONGO_URLused by our app to connect to MongoDB. This URL points to themongodbservice defined in the compose file below.depends_on: - mongodb: Ensures thets-express-appservice starts after themongodbservice.
b.) mongodb:
This service defines the MongoDB database.
image: mongo: Uses the official MongoDB image from Docker Hub.container_name: mongodb: Sets the container name tomongodb.volumes: - my-ts-app-data:/data/db: Mounts the Docker volumemy-ts-app-datato/data/dbin the container, which is where MongoDB stores its data. (again, we have learnt this before so need to explain in depth)ports: - "27017:27017": Port mapping as usual (again no need to explain……. phewww….)
3.) Volumes
- my-ts-app-data: We define what volumes we are using here in the end of our file.
Ok, so now since we have learnt compose file, copy the above code and define a docker-compose.yml file in root directory of our app. Then go in terminal and run command **docker-compose up --build** and wait for it to build your images and start the containers. You will see success message and now finally your mongo and express app containers are up running on same network properly connected to the volumes we defined ready to use.
To stop the application use command — docker-compose down
Below are the images of our docker dashboard where you can see a docker container running within 2 containers our running (of our mongo and express app). In third image I added some data using POSTMAN and then retrieved the data from our DB using GET req.


It was easy, na!:)
Also, we can additionally define a custom network like below and some other custom self explanatory things. If we do not define network like we did it in above one, docker will automatically create a default network for our services. This default network is usually named after the project directory where our docker-compose.yml file resides.
I have also attached link to my github repo of our express app below, just clone, install the libraries, create the volume as defined in the docker-compose.yml file and run docker-compose up --build command.## GitHub - ishaangupta-YB/docker-compose-tutorial
Contribute to ishaangupta-YB/docker-compose-tutorial development by creating an account on GitHub.
github.com
Yup, that’s it. That’s your docker-compose primarily! The rest is on you to explore!
There are still many more advanced things to learn in docker, but for this article this will be all. I will be writing 2nd part of this article soon and one on kubernetes too. Till then practice what we learnt today.
Final Thoughts
In this article, I’ve covered almost most of the basic to intermediate fundamental concepts of docker with examples. I tried to explain everything that a beginner need to be explained and I can confidently say that you are docker ready!
I hope you understood and will make out most of it, i know this article might be lengthy but trust me I tried to summarise everything a beginner needs to get started with docker. As usual, always read the official documentation when in trouble or if you want to try new things with docker on your own.
Kindly clap & comment if you want more articles on such topics/technologies. Share this article with your friends and who want to learn docker!

GIF From GIPHY
Medium Top 4x Writer. CSE Sophomore. Engineer. Love Finance
More from Ishaan Gupta and Level Up Coding
Recommended from Medium
[
See more recommendations
](https://medium.com/?source=post_page---read_next_recirc--68555aa3e544---------------------------------------)