Cilium: Installing Cilium in GKE with no Kube-Proxy
Source: docs.cilium.io
☸ ️Introduction
kube-proxy is a component of Kubernetes that handles routing traffic for services within the cluster. kube-proxy is a controller that runs on each worker node in a cluster. It watches Kubernetes Service objects, and creates iptables rules to forward packets that are sent to Service addresses.
Note- The tutorial has taken the example of GKE dataplane v1 for removing kube-proxy.
Need for Kube-Proxy:
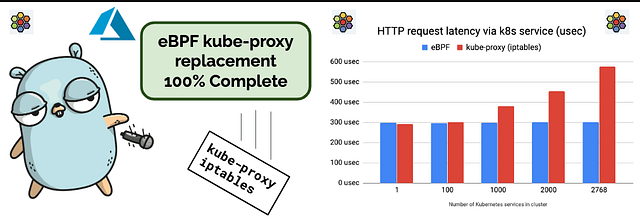
IPtables and Netfilter are the two foundational technologies of kube-proxy for implementing the Service abstraction. They carry legacy accumulated over 20 years of development grounded in more traditional networking environments that are typically far more static than your average Kubernetes cluster. In the age of cloud native, they are no longer the best tool for the job, especially in terms of performance, reliability, scalability, and operations.
Cilium to the rescue
Cilium’s kube-proxy replacement offers advanced configuration modes to cater to your specific needs. Features like client source IP preservation ensure that your service connections remain intact, while Maglev Consistent Hashing enhances load balancing and resiliency. With support for Direct Server Return (DSR) and Hybrid DSR/SNAT modes, you can optimize traffic routing and improve performance.
🎯Goals & Objectives
In this article you will learn how GKE-managed kube-proxy can be disabled by automatically bootstrapping GKE nodes with daemonsets and how to install Cilium as the CNI.
Pre-Requisites
- You should have a Google Subscription.
- Install kubectl.
- Install Helm.
- Install gcloud CLI.
- Ensure you have enough quota resources to create a GKE cluster. In the Google Cloud console, go to the Quotas page.
- The quotas page displays the list of quotas that are prefiltered to GKE quotas. - Default GKE cluster is running with kube-proxy (See below)
- You can apply a
node-init-entrypointconfigmap and daemonset in a new or existing GKE cluster
-To begin with, create a YAML configuration file with the desired settings:apiVersion: v1 kind: ConfigMap metadata: name: node-init-entrypoint labels: app: node-init data: entrypoint.sh: | #!/usr/bin/env bash set -euo pipefail ROOT_MOUNT_DIR="${ROOT_MOUNT_DIR:-/root}" rm -f "${ROOT_MOUNT_DIR}/etc/kubernetes/manifests/kube-proxy.manifest" --- apiVersion: apps/v1 kind: DaemonSet metadata: name: node-init-node-initializer labels: app: node-init spec: selector: matchLabels: app: node-init updateStrategy: type: RollingUpdate template: metadata: labels: app: node-init spec: volumes: - name: root-mount hostPath: path: / - name: entrypoint configMap: name: node-init-entrypoint defaultMode: 0744 initContainers: - image: ubuntu:18.04 name: node-initializer command: ["/scripts/entrypoint.sh"] env: - name: ROOT_MOUNT_DIR value: /root securityContext: privileged: true volumeMounts: - name: root-mount mountPath: /root - name: entrypoint mountPath: /scripts containers: - image: "gcr.io/google-containers/pause:2.0" name: pause
Let’s get going
Set the Project
If you have multiple GCP Project, choose the project you want to use.
- Replace Project_ID with your Project.
gcloud config set project PROJECT_ID
Create a new cluster and disable kube-proxy
- Create a GKE cluster using the default VPC (Optional) that exist for the respective region in which you are creating the GKE cluster.
- You can create a distinct VPC alternatively and use that.gcloud container clusters create amitgag-test-16908 --project ########## --zone us-west2-a --image-type COS_CONTAINERD
Set the Kubernetes Context
Log in to the Google cloud portal and browse to Kubernetes Engine > select the respective Kubernetes cluster that was created ( GKE Cluster) and click on connect. This will help you connect to your GKE cluster and set the respective Kubernetes context.
gcloud container clusters get-credentials amitgag-test-16908 --zone us-west2-a --project PROJECT_ID
node-init-entrypoint configmap and daemonset using the yaml file created in the pre-requisites section.
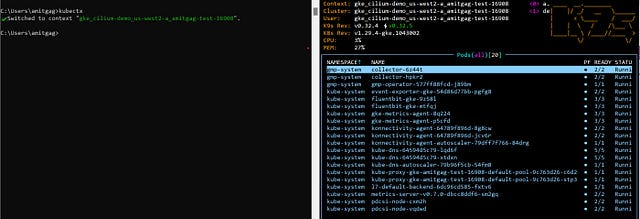
- Check if there are any kube-proxy pods running.
kubectl get pods -A -o wide
NAMESPACE     NAME                                            READY   STATUS    RESTARTS      AGE    IP            NODE                                                NOMINATED NODE   READINESS GATES
default       node-init-node-initializer-jhhmw                1/1     Running   0             83m    10.20.0.164   gke-amitgag-test-16908-default-pool-9c763d26-stp3   <none>           <none>
default       node-init-node-initializer-wzkw8                1/1     Running   0             83m    10.20.1.102   gke-amitgag-test-16908-default-pool-9c763d26-c6d2   <none>           <none>
gmp-system    collector-lm47b                                 2/2     Running   0             83m    10.20.0.240   gke-amitgag-test-16908-default-pool-9c763d26-stp3   <none>           <none>
gmp-system    collector-nvvwk                                 2/2     Running   0             83m    10.20.1.206   gke-amitgag-test-16908-default-pool-9c763d26-c6d2   <none>           <none>
gmp-system    gmp-operator-76676cccf-2h2lp                    1/1     Running   0             83m    10.20.0.55    gke-amitgag-test-16908-default-pool-9c763d26-stp3   <none>           <none>
kube-system   event-exporter-gke-766bc76558-m9vx8             2/2     Running   0             83m    10.20.0.14    gke-amitgag-test-16908-default-pool-9c763d26-stp3   <none>           <none>
kube-system   fluentbit-gke-rhp8s                             3/3     Running   0             87m    10.168.0.62   gke-amitgag-test-16908-default-pool-9c763d26-stp3   <none>           <none>
kube-system   fluentbit-gke-tlfgn                             3/3     Running   0             87m    10.168.0.63   gke-amitgag-test-16908-default-pool-9c763d26-c6d2   <none>           <none>
kube-system   gke-metrics-agent-9b9w9                         3/3     Running   0             89m    10.168.0.62   gke-amitgag-test-16908-default-pool-9c763d26-stp3   <none>           <none>
kube-system   gke-metrics-agent-lfjxm                         3/3     Running   0             89m    10.168.0.63   gke-amitgag-test-16908-default-pool-9c763d26-c6d2   <none>           <none>
kube-system   konnectivity-agent-746646fccf-nhnxd             2/2     Running   0             82m    10.20.0.223   gke-amitgag-test-16908-default-pool-9c763d26-stp3   <none>           <none>
kube-system   konnectivity-agent-746646fccf-skfsw             2/2     Running   0             82m    10.20.1.216   gke-amitgag-test-16908-default-pool-9c763d26-c6d2   <none>           <none>
kube-system   konnectivity-agent-autoscaler-67d4f7d5f-tczfw   1/1     Running   0             82m    10.20.0.173   gke-amitgag-test-16908-default-pool-9c763d26-stp3   <none>           <none>
kube-system   kube-dns-5f76555c8f-cj8g6                       5/5     Running   0             82m    10.20.0.96    gke-amitgag-test-16908-default-pool-9c763d26-stp3   <none>           <none>
kube-system   kube-dns-5f76555c8f-mqqqp                       5/5     Running   0             82m    10.20.1.131   gke-amitgag-test-16908-default-pool-9c763d26-c6d2   <none>           <none>
kube-system   kube-dns-autoscaler-79b96f5cb-t9nmd             1/1     Running   0             81m    10.20.1.219   gke-amitgag-test-16908-default-pool-9c763d26-c6d2   <none>           <none>
kube-system   l7-default-backend-6484dd554-w4djc              1/1     Running   0             81m    10.20.1.167   gke-amitgag-test-16908-default-pool-9c763d26-c6d2   <none>           <none>
kube-system   metrics-server-v0.7.1-6b8d6d8c46-xr985          2/2     Running   0             81m    10.20.1.18    gke-amitgag-test-16908-default-pool-9c763d26-c6d2   <none>           <none>
kube-system   pdcsi-node-7fx8r                                2/2     Running   0             89m    10.168.0.62   gke-amitgag-test-16908-default-pool-9c763d26-stp3   <none>           <none>
kube-system   pdcsi-node-rt6kz
Install Cilium (Optional)
Note- The tutorial has taken the example of GKE dataplane v1 for removing kube-proxy.
-
You can get the value for
*API_SERVER_IP*by logging in to the Google Cloud Console and navigating to "Home" > "Kubernetes Fine" > select the cluster > "External Endpoint". Set*API_SERVER_PORT*to*443*as that's the default port used by GKE to expose the Kubernetes API of GKE clusters.
-
Taking an example of a GKE instance the values for
and can also be deduced via kubectl cluster-info - Set up Helm repository
helm repo add cilium https://helm.cilium.io/ - Install Cilium
export API_SERVER_IP=<value obtained above> export API_SERVER_PORT=<value obtained above> helm install cilium cilium/cilium --version 1.14.12 --namespace kube-system --set nodeinit.enabled=true --set nodeinit.reconfigureKubelet=true --set nodeinit.removeCbrBridge=true --set cni.binPath=/home/kubernetes/bin --set gke.enabled=true --set ipam.mode=kubernetes --set ipv4NativeRoutingCIDR=$NATIVE_CIDR --set kubeProxyReplacement=true --set k8sServiceHost=${API_SERVER_IP} --set k8sServicePort=${API_SERVER_PORT} - As we can check, kube-proxy is not detected and Cilium takes over completely.
kubectl get pods -A -o wide
NAMESPACE     NAME                                            READY   STATUS    RESTARTS      AGE    IP            NODE                                                NOMINATED NODE   READINESS GATES
default       node-init-node-initializer-jhhmw                1/1     Running   0             83m    10.20.0.164   gke-amitgag-test-16908-default-pool-9c763d26-stp3   <none>           <none>
default       node-init-node-initializer-wzkw8                1/1     Running   0             83m    10.20.1.102   gke-amitgag-test-16908-default-pool-9c763d26-c6d2   <none>           <none>
gmp-system    collector-lm47b                                 2/2     Running   0             83m    10.20.0.240   gke-amitgag-test-16908-default-pool-9c763d26-stp3   <none>           <none>
gmp-system    collector-nvvwk                                 2/2     Running   0             83m    10.20.1.206   gke-amitgag-test-16908-default-pool-9c763d26-c6d2   <none>           <none>
gmp-system    gmp-operator-76676cccf-2h2lp                    1/1     Running   0             83m    10.20.0.55    gke-amitgag-test-16908-default-pool-9c763d26-stp3   <none>           <none>
kube-system   cilium-node-init-jvwv8                          1/1     Running   0             106m   10.168.0.63   gke-amitgag-test-16908-default-pool-9c763d26-c6d2   <none>           <none>
kube-system   cilium-node-init-lx4w6                          1/1     Running   0             106m   10.168.0.62   gke-amitgag-test-16908-default-pool-9c763d26-stp3   <none>           <none>
kube-system   cilium-operator-7676f7459d-68ljf                1/1     Running   3 (93m ago)   106m   10.168.0.62   gke-amitgag-test-16908-default-pool-9c763d26-stp3   <none>           <none>
kube-system   cilium-operator-7676f7459d-6m4wr                1/1     Running   3 (93m ago)   106m   10.168.0.63   gke-amitgag-test-16908-default-pool-9c763d26-c6d2   <none>           <none>
kube-system   cilium-qnjx9                                    1/1     Running   0             106m   10.168.0.62   gke-amitgag-test-16908-default-pool-9c763d26-stp3   <none>           <none>
kube-system   cilium-qpp7c                                    1/1     Running   0             106m   10.168.0.63   gke-amitgag-test-16908-default-pool-9c763d26-c6d2   <none>           <none>
kube-system   event-exporter-gke-766bc76558-m9vx8             2/2     Running   0             83m    10.20.0.14    gke-amitgag-test-16908-default-pool-9c763d26-stp3   <none>           <none>
kube-system   fluentbit-gke-rhp8s                             3/3     Running   0             87m    10.168.0.62   gke-amitgag-test-16908-default-pool-9c763d26-stp3   <none>           <none>
kube-system   fluentbit-gke-tlfgn                             3/3     Running   0             87m    10.168.0.63   gke-amitgag-test-16908-default-pool-9c763d26-c6d2   <none>           <none>
kube-system   gke-metrics-agent-9b9w9                         3/3     Running   0             89m    10.168.0.62   gke-amitgag-test-16908-default-pool-9c763d26-stp3   <none>           <none>
kube-system   gke-metrics-agent-lfjxm                         3/3     Running   0             89m    10.168.0.63   gke-amitgag-test-16908-default-pool-9c763d26-c6d2   <none>           <none>
kube-system   konnectivity-agent-746646fccf-nhnxd             2/2     Running   0             82m    10.20.0.223   gke-amitgag-test-16908-default-pool-9c763d26-stp3   <none>           <none>
kube-system   konnectivity-agent-746646fccf-skfsw             2/2     Running   0             82m    10.20.1.216   gke-amitgag-test-16908-default-pool-9c763d26-c6d2   <none>           <none>
kube-system   konnectivity-agent-autoscaler-67d4f7d5f-tczfw   1/1     Running   0             82m    10.20.0.173   gke-amitgag-test-16908-default-pool-9c763d26-stp3   <none>           <none>
kube-system   kube-dns-5f76555c8f-cj8g6                       5/5     Running   0             82m    10.20.0.96    gke-amitgag-test-16908-default-pool-9c763d26-stp3   <none>           <none>
kube-system   kube-dns-5f76555c8f-mqqqp                       5/5     Running   0             82m    10.20.1.131   gke-amitgag-test-16908-default-pool-9c763d26-c6d2   <none>           <none>
kube-system   kube-dns-autoscaler-79b96f5cb-t9nmd             1/1     Running   0             81m    10.20.1.219   gke-amitgag-test-16908-default-pool-9c763d26-c6d2   <none>           <none>
kube-system   l7-default-backend-6484dd554-w4djc              1/1     Running   0             81m    10.20.1.167   gke-amitgag-test-16908-default-pool-9c763d26-c6d2   <none>           <none>
kube-system   metrics-server-v0.7.1-6b8d6d8c46-xr985          2/2     Running   0             81m    10.20.1.18    gke-amitgag-test-16908-default-pool-9c763d26-c6d2   <none>           <none>
kube-system   pdcsi-node-7fx8r                                2/2     Running   0             89m    10.168.0.62   gke-amitgag-test-16908-default-pool-9c763d26-stp3   <none>           <none>
kube-system   pdcsi-node-rt6kz                                2/2     Running   0             89m    10.168.0.63   gke-amitgag-test-16908-default-pool-9c763d26-c6d2   <none>           <none>
Cilium is installed witk KPR set to True
How can we ensure that kube-proxy is not installed post a Kubernetes version upgrade?
- You can also optionally validate that
kube-proxyis not installed as an add-on a subsequent kubernetes upgrade. - As you can see in this example below, the GKE cluster is upgraded from k8s version
1.29.4to k8s version1.29.6and we don’t seekube-proxybeing enabled as an add-on.
- Fetch the respetive versions that are available to which we can upgrade the GKE cluster.gcloud container get-server-config Fetching server config for us-west2-a channels: - channel: RAPID defaultVersion: 1.30.1-gke.1329000 validVersions: - 1.30.2-gke.1023000 - 1.30.1-gke.1329000 - 1.29.6-gke.1038000 - 1.29.5-gke.1091000 - 1.28.11-gke.1019000 - 1.28.10-gke.1148000 - 1.28.10-gke.1089000 - 1.27.15-gke.1012000 - 1.27.14-gke.1100000 - 1.27.14-gke.1059000 - 1.26.15-gke.1469000 - 1.26.15-gke.1404000 - channel: REGULAR defaultVersion: 1.29.4-gke.1043002 validVersions: - 1.29.5-gke.1091000 - 1.29.5-gke.1060000 - 1.29.4-gke.1043002 - 1.28.10-gke.1075000 - 1.28.10-gke.1058000 - 1.28.9-gke.1289000 - 1.27.14-gke.1042000 - 1.27.14-gke.1022000 - 1.27.13-gke.1201000 - 1.26.15-gke.1390000 - 1.26.15-gke.1381000 - 1.26.15-gke.1320000 - channel: STABLE defaultVersion: 1.27.13-gke.1070000 validVersions: - 1.29.4-gke.1043002 - 1.28.9-gke.1289000 - 1.28.9-gke.1209000 - 1.28.9-gke.1069000 - Initiate the upgrade
gcloud container clusters upgrade amitgag-test-16908 --master --cluster-version 1.29.6-gke.1038000 Master of cluster [amitgag-test-16908] will be upgraded from version [1.29.4-gke.1043002] to version [1.29.6-gke.1038000]. This operation is long-running and will block other operations on the cluster (including delete) until it has run to completion. Do you want to continue (Y/n)? Y Upgrading amitgag-test-16908...| - Validate that the Cilium agent is running in the desired mode
kubectl -n kube-system exec ds/cilium -- cilium status | grep KubeProxyReplacement Defaulted container "cilium-agent" out of: cilium-agent, config (init), mount-cgroup (init), apply-sysctl-overwrites (init), mount-bpf-fs (init), wait-for-node-init (init), clean-cilium-state (init), install-cni-binaries (init) KubeProxyReplacement: True [eth0 10.168.0.63 (Direct Routing)] - Validate that
kube-proxyis not present post the upgrade.kubectl get cm -A NAMESPACE NAME DATA AGE default kube-root-ca.crt 1 154m default node-init-entrypoint 1 142m gke-managed-system kube-root-ca.crt 1 154m gmp-public kube-root-ca.crt 1 154m gmp-system collector 1 152m gmp-system config-images 3 153m gmp-system kube-root-ca.crt 1 154m gmp-system rule-evaluator 1 152m gmp-system rules-generated 1 152m kube-node-lease kube-root-ca.crt 1 154m kube-public kube-root-ca.crt 1 154m kube-system cilium-config 105 114m kube-system cluster-autoscaler-status 1 154m kube-system cluster-kubestore 0 154m kube-system clustermetrics 0 154m kube-system core-metrics-exporter-conf 1 154m kube-system extension-apiserver-authentication 6 154m kube-system fluentbit-gke-config-v1.4.0 3 154m kube-system fluentbit-metrics-collector-config-map 1 154m kube-system gke-common-webhook-heartbeat 5 154m kube-system gke-metrics-agent-conf 1 154m kube-system ingress-uid 2 154m kube-system konnectivity-agent-autoscaler-config 1 154m kube-system konnectivity-agent-metrics-collector-config-map 1 154m kube-system kube-apiserver-legacy-service-account-token-tracking 1 154m kube-system kube-dns 0 154m kube-system kube-dns-autoscaler 1 152m kube-system kube-root-ca.crt 1 154m kube-system kubedns-config-images 5 154m kube-system kubedns-metrics-collector-config-map 1 154m kube-system metrics-server-config 1 153m kube-system prometheus-metrics-collector-config-map 6 154m
No Kube-Proxy remanants on a successful k8s upgrade
References
- Automatically bootstrap GKE nodes with DaemonSets
- GKE Daemonsets tutorial - Upgrade a GKE cluster
- Create a GKE cluster in a zone
- Getting started with Cilium
- Cilium minus Kube-Proxy
- Insights into Kube-Proxy Replacement
Try out Cilium
- Try out Cilium and get a first-hand experience of how it solves some real problems and use-cases in your cloud-native or on-prem environments related to Networking, Security or Observability.
🌟Conclusion 🌟
Hopefully, this post gave you a good overview of how to install Cilium on GKE with no kube-proxy. Thank you for Reading!! 🙌🏻😁📃, see you in the next blog.
🚀 Feel free to connect/follow with me/on:
LinkedIn: linkedin.com/in/agamitgupta
More from Amit Gupta
Recommended from Medium
[
See more recommendations
](https://medium.com/?source=post_page---read_next_recirc--826e84f971b4---------------------------------------)